Outline
- Ch9: User Roles
- Ch10: User Profiles
- Ch11: Blog Posts
Ch9: User Roles
Not all users of web applications are created equal
- A simple application may need just two roles, one for regular users and one for administrators
- In this case, having an is_administrator Boolean field in the User model is enough
- But in some applications it may not even make sense to talk about discrete roles
- Instead, giving users a combination of
permissionsmay be the right approach
- Instead, giving users a combination of
The user role implementation presented in this chapter is a hybrid between discrete roles and permissions.
- Users are assigned a discrete role, but the roles are defined in terms of permissions
Database Representation of Roles
In [ ]:
# app/models.py

#...

class Role(db.Model):
    __tablename__ = 'roles'
    id = db.Column(db.Integer, primary_key=True)
    name = db.Column(db.String(64), unique=True)
    default = db.Column(db.Boolean, default=False, index=True)
    permissions = db.Column(db.Integer)
    users = db.relationship('User', backref='role', lazy='dynamic')

    def __repr__(self):
        return '<Role %r>' % self.name

#...
default
- Should be set to
Truefor only one role andFalsefor all the others - The role marked as default will be the one assigned to new users upon registration
permissions
- We use an integer as bit flags.
- Each task will be assigned a bit position
- The tasks that are allowed for that role will have their bits set to 1
- A total of eight bits was allocated to tasks and five have been used.
| Task name | Bit value | Description |
|---|---|---|
| Follow users | 0b00000001 (0x01) | Follow other users |
| Comment on posts made by others | 0b00000010 (0x02) | Comment on articles written by others |
| Write articles | 0b00000100 (0x04) | Write original articles |
| Moderate comments made by others | 0b00001000 (0x08) | Suppress offensive comments made by others |
| Administration access | 0b10000000 (0x80) | Administrative access to the site |
In [ ]:
# app/models.py

#...

class Permission:
    FOLLOW = 0x01
    COMMENT = 0x02
    WRITE_ARTICLES = 0x04
    MODERATE_COMMENTS = 0x08
    ADMINISTER = 0x80

#...
User roles and permission bits
- You can add new roles in the future with different combinations of permissions.
| User role | Permissions | Description |
|---|---|---|
| Anonymous | 0b00000000 (0x00) | User who is not logged in. Read-only access to the application. |
| User | 0b00000111 (0x07) | Basic permissions to write articles and comments and to follow other users. This is the default for new users. |
| Moderator | 0b00001111 (0x0f) | Adds permission to suppress comments deemed offensive or inappropriate. |
| Administrator | 0b11111111 (0xff) | Full access, which includes permission to change the roles of other users. |
Create roles in the database
- Adding the roles to the database manually is time consuming and error prone
- We will add a class method called
insert_roles()to theRoleclass to create roles in the database
In [ ]:
# app/models.py

#...

class Role(db.Model):
    #...

    @staticmethod
    def insert_roles():
        roles = {
            'User': (Permission.FOLLOW |
                     Permission.COMMENT |
                     Permission.WRITE_ARTICLES, True),
            'Moderator': (Permission.FOLLOW |
                          Permission.COMMENT |
                          Permission.WRITE_ARTICLES |
                          Permission.MODERATE_COMMENTS, False),
            'Administrator': (0xff, False)
        }
        for r in roles:
            role = Role.query.filter_by(name=r).first()
            if role is None:
                role = Role(name=r)
            role.permissions = roles[r][0]
            role.default = roles[r][1]
            db.session.add(role)
        db.session.commit()
To add a new role or change the permission assignments for a role, change the roles dictionary inside the insert_roles() and rerun the function
Upgrade database
(venv) $ python manage.py db upgrade
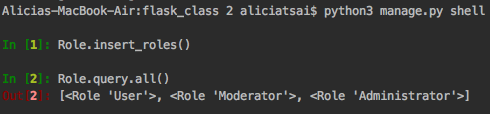
To apply these roles to the database, a shell session can be used
(venv) $ python manage.py shell
>>> Role.insert_roles()
>>> Role.query.all()
[<Role 'Administrator'>, <Role 'User'>, <Role 'Moderator'>]
Role Assignment
For most users, the default role at registration time is "User" role.
The administrator needs to be assigned the “Administrator” role from the start
- This user is identified by an email address stored in the
FLASKY_ADMINconfiguration variable.- As soon as that email address appears in a registration request it can be given the correct role.
Define a default role for users
- If the object does not have a role defined, it sets the
administratorordefaultroles depending on the email address.
In [ ]:
# app/models.py

#...

class User(UserMixin, db.Model):
    #...

    def __init__(self, **kwargs):
        super(User, self).__init__(**kwargs)
        if self.role is None:
            if self.email == current_app.config['FLASKY_ADMIN']:
                self.role = Role.query.filter_by(permissions=0xff).first()
            else:
                self.role = Role.query.filter_by(default=True).first()
    #...
Role Verification
Evaluate whether a user has a given permission
In [ ]:
# app/models.py

# ...
class User(UserMixin, db.Model):
    # ...

    def can(self, permissions):
        return self.role is not None and \
            (self.role.permissions & permissions) == permissions

    def is_administrator(self):
        return self.can(Permission.ADMINISTER)
Create anonymous user model
- To enable the application to freely call
current_user.can()andcurrent_user.is_administrator()without having to check whether the user is logged in first. - Inherits from Flask-Login's
AnonymousUserMixinclass and is registered tocurrent_userwhen the user is not logged in. - Create a custom
AnonymousUserclass that implements thecan()andis_administrator()methods.
In [ ]:
# app/models.py

#...
from flask_login import UserMixin, AnonymousUserMixin

#...

class AnonymousUser(AnonymousUserMixin):
    def can(self, permissions):
        return False

    def is_administrator(self):
        return False

login_manager.anonymous_user = AnonymousUser
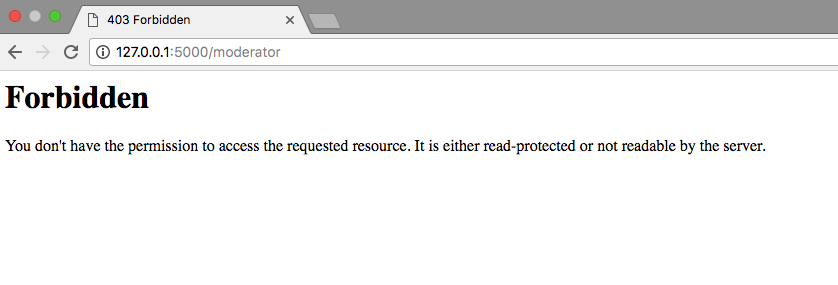
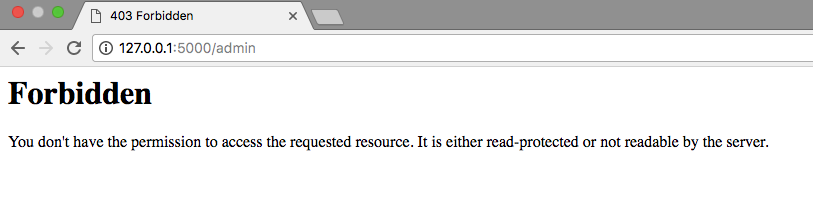
View function is available only to users with certain permissions
Implement two customized decorators to check user permissions
- One for generic permission checks
- The other that checks specifically for administrator permission
Note: If you are unfamiliar with decorator, please refer to http://tw.pyladies.com/~maomao/6_effective_python.slides.html#/1.
In [ ]:
# app/decorators.py

from functools import wraps
from flask import abort
from flask_login import current_user
from .models import Permission

def permission_required(permission):
    def decorator(f):
        @wraps(f)
        def decorated_function(*args, **kwargs):
            if not current_user.can(permission):
                abort(403)
            return f(*args, **kwargs)
        return decorated_function
    return decorator

def admin_required(f):
    return permission_required(Permission.ADMINISTER)(f)
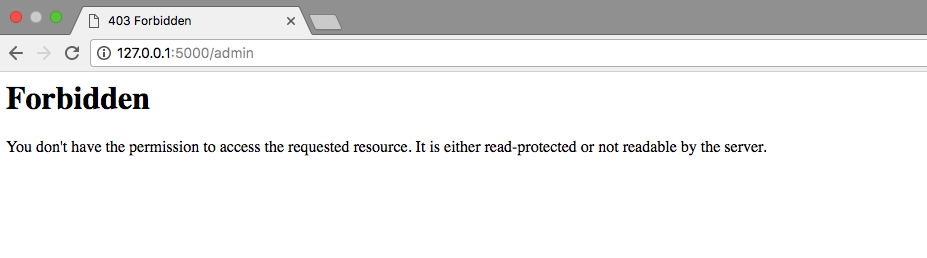
Add 403 error page to template
In [ ]:
<!-- app/templates/403.html -->

{% extends "base.html" %}

{% block title %}Flasky - Forbidden{% endblock %}

{% block page_content %}
<div class="page-header">
    <h1>Forbidden</h1>
</div>
{% endblock %}
Demonstrate the usage of the two decorators
In [ ]:
# app/main/views.py
from flask import render_template
from flask_login import login_required
from . import main
from ..decorators import admin_required, permission_required
from ..models import Permission
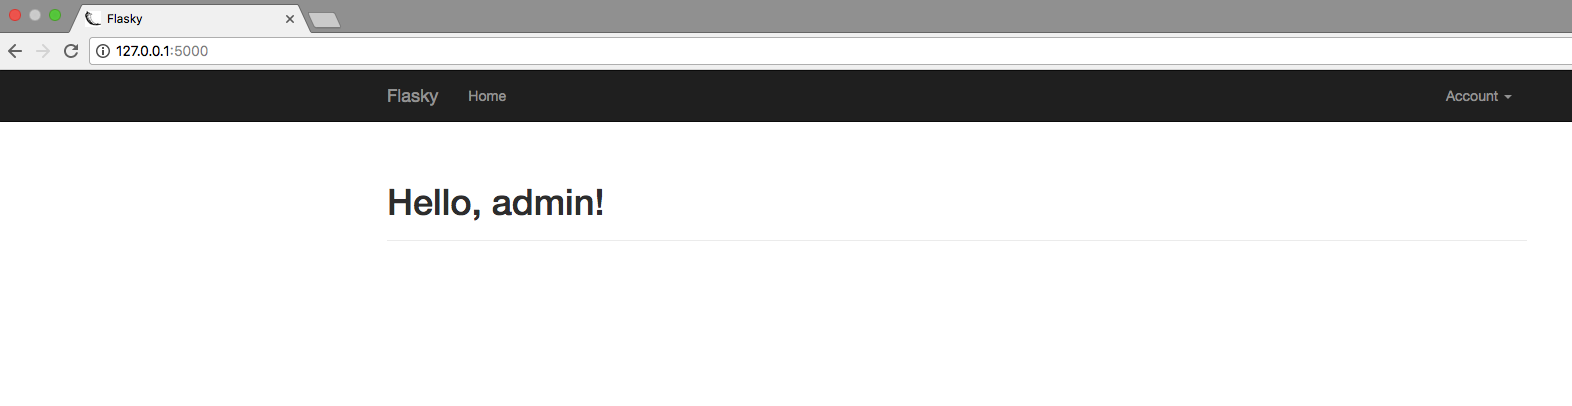
@main.route('/')
def index():
return render_template('index.html')
@main.route('/admin')
@login_required
@admin_required
def for_admins_only():
return "For administrators!"
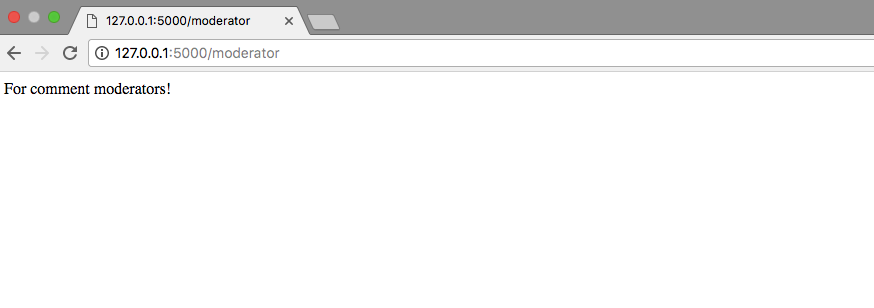
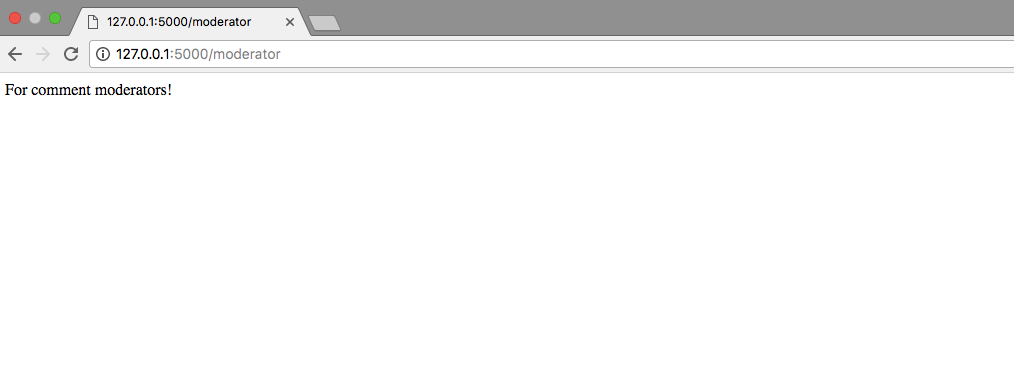
@main.route('/moderator')
@login_required
@permission_required(Permission.MODERATE_COMMENTS)
def for_moderators_only():
return "For comment moderators!"
Create user, moderator and administrator in the database
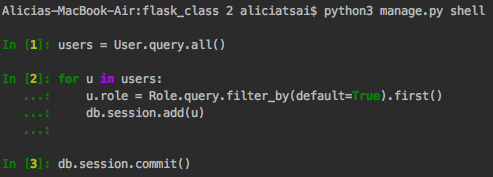
If your database already has data, use shell to add role to your old data
(venv) $ python manage.py shell
>>> users = User.query.all()
>>> for u in users:
...     u.role = Role.query.filter_by(default=True).first()
...     db.session.add(u)
>>> db.session.commit()
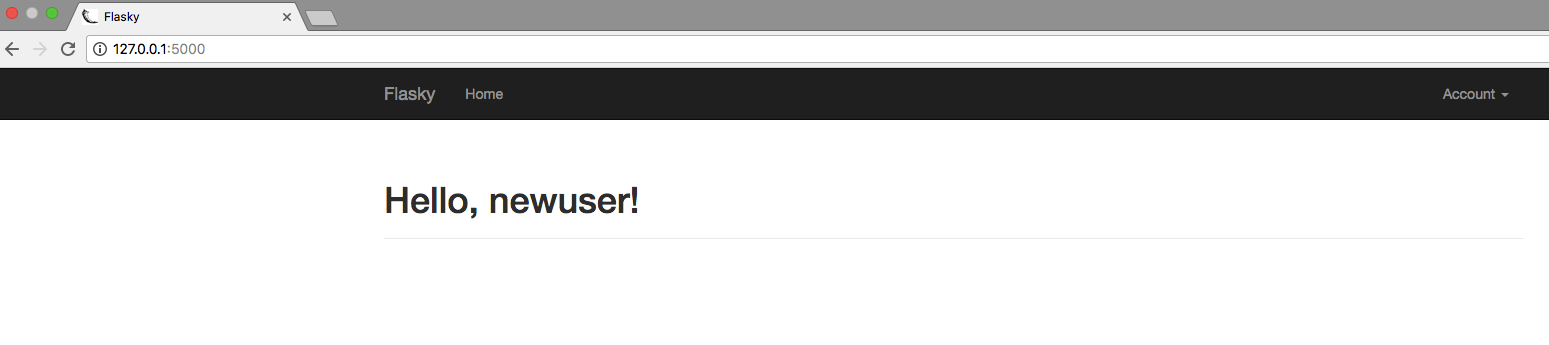
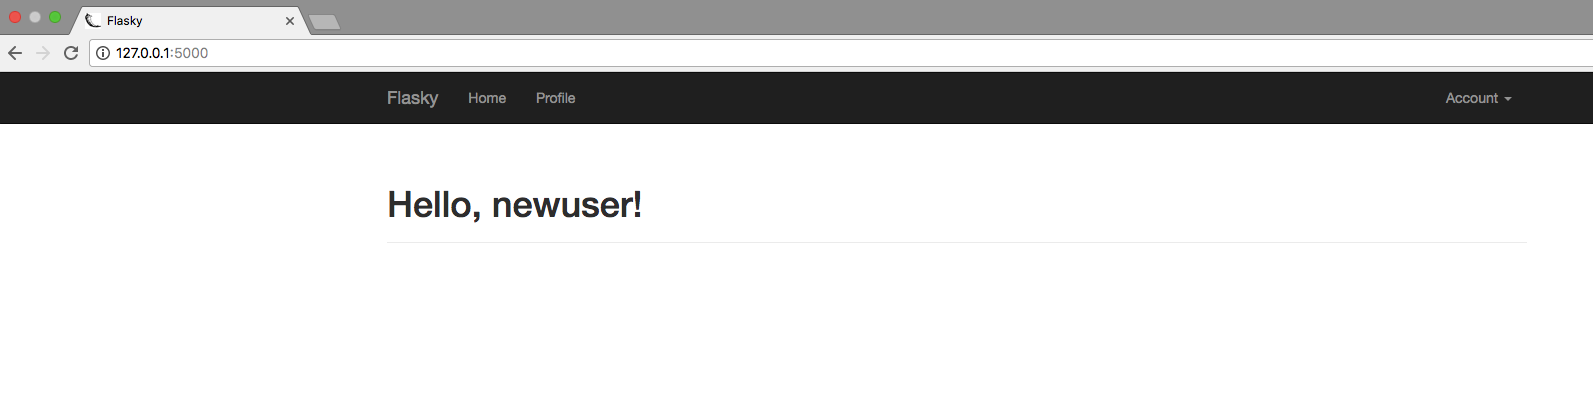
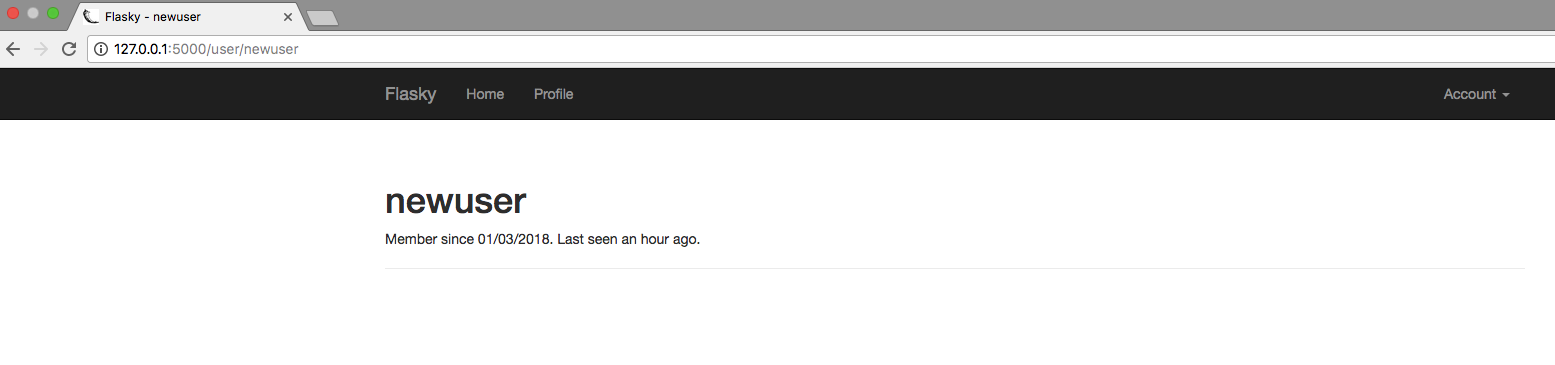
If your database doesn't have any data, create new user from your shell
(venv) $ python manage.py shell
>>> u = User(username="newuser", email="newuser@pyladies.com", password="123456", confirmed=True)
>>> db.session.add(u)
>>> db.session.commit()

Create a user with moderator role in the database
>>> u = User(username="alicia", email="alicia@pyladies.com", password="123456", confirmed=True, role=Role.query.filter_by(name="Moderator").first())
>>> db.session.add(u)
>>> db.session.commit()
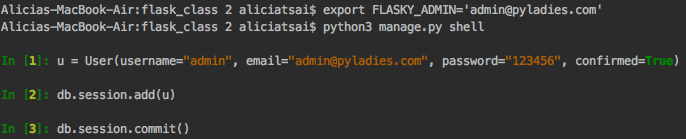
Set administrator's email as an environment variable.
- We need to set the administrator email in the environment variables.
Mac
(venv) $ export FLASKY_ADMIN="admin@pyladies.com"
Microsoft
(venv) $ set FLASKY_ADMIN="admin@pyladies.com"
Create a user with administrator role in the database
(venv) $ python manage.py shell
>>> u = User(username="admin", email="admin@pyladies.com", password="123456", confirmed=True)
>>> db.session.add(u)
>>> db.session.commit()
Demonstrate view function
(venv) $ python manage.py runserver

Add verification in templates
Make Permission globally available to all templates.
- Permissions may also need to be checked from templates.
- To avoid having to add a template argument in every
render_template()call, add thePermissionclass to the template context by a context processor. - Context processors make variables globally available to all templates
In [ ]:
# app/main/__init__.py

#...

from ..models import Permission

#...

@main.app_context_processor
def inject_permissions():
    return dict(Permission=Permission)
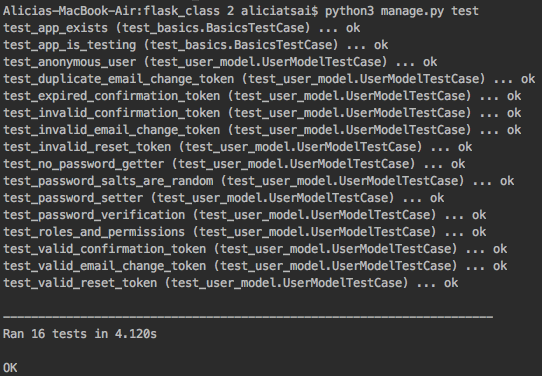
Unit tests for roles and permissions
- The new roles and permissions can be exercised in unit tests.
In [ ]:
# tests/test_user_model.py

#...
from app.models import User, Role, Permission, AnonymousUser


class UserModelTestCase(unittest.TestCase):
    #...

    def test_roles_and_permissions(self):
        Role.insert_roles()
        u = User(email='john@example.com', password='cat')
        self.assertTrue(u.can(Permission.WRITE_ARTICLES))
        self.assertFalse(u.can(Permission.MODERATE_COMMENTS))

    def test_anonymous_user(self):
        u = AnonymousUser()
        self.assertFalse(u.can(Permission.FOLLOW))
You can get the above code from github
$git clone https://github.com/win911/flask_class.git- Skip this if you have done it before.
$git checkout 9a- If any error occurs, do "$ git pull origin master" first.
Remember to upgrade your DB
$python manage.py db upgrade
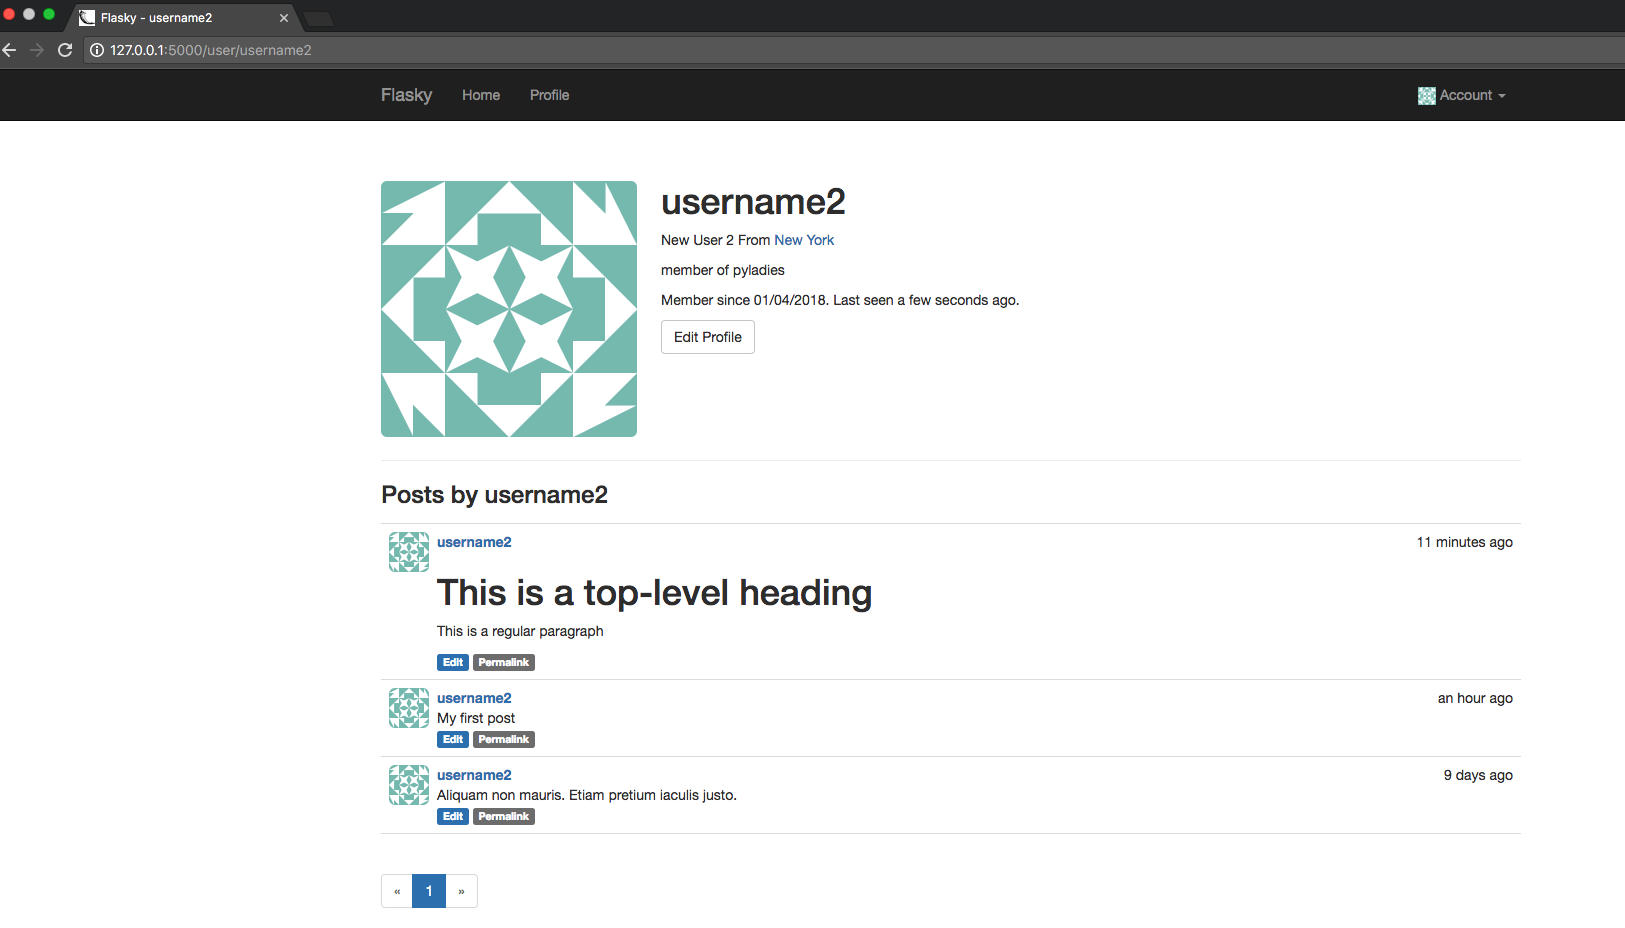
Ch10: User Profiles
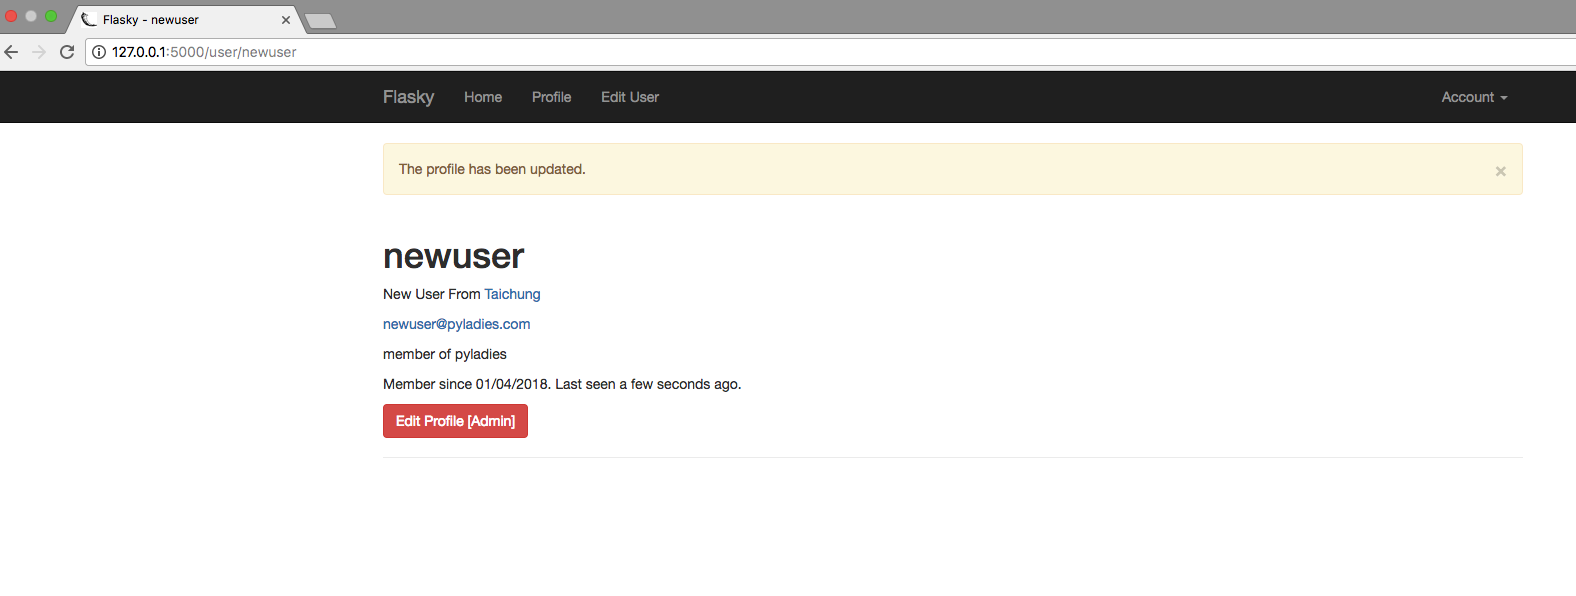
In this chapter, user profiles are implemented. All socially aware sites give their users a profile page, where a summary of the user’s participation in the website is presented.
Profile Information
- The User model is extended with several new fields
- For some additional information about users can be recorded
In [ ]:
# app/models.py

from datetime import datetime

#...

class User(UserMixin, db.Model):
    #...
    name = db.Column(db.String(64))
    location = db.Column(db.String(64))
    about_me = db.Column(db.Text())
    member_since = db.Column(db.DateTime(), default=datetime.utcnow)
    last_seen = db.Column(db.DateTime(), default=datetime.utcnow)

    #...
db.String vs. db.Text
db.string: a string with a maximum length (optional in some databases, e.g. PostgreSQL)db.Text: some longer unicode text, does not need a maximum length
Note: datetime.utcnow is missing the () at the end
- Because the
defaultargument todb.Column()can take a function as a default value - Each time a default value needs to be generated the function is invoked to produce it
Refresh last visit time of a user
- The
last_seenfield is initialized to the current time upon creation. - But it needs to be refreshed each time the user accesses the site.
In [ ]:
# app/models.py

from datetime import datetime

#...

class User(UserMixin, db.Model):
    #...

    def ping(self):
        self.last_seen = datetime.utcnow()
        db.session.add(self)
Ping logged-in user
- The
ping()method must be called each time a request from the user is received. - The
before_app_requesthandler in theauthblueprint runs before every request. - After the user logged-in, we ping the user and record the
last_seenfield.
In [ ]:
# app/auth/views.py

#...

@auth.before_app_request
def before_request():
    if current_user.is_authenticated:
        current_user.ping()
        if not current_user.confirmed \
                and request.endpoint \
                and request.endpoint[:5] != 'auth.' \
                and request.endpoint != 'static':
            return redirect(url_for('auth.unconfirmed'))

#...
Upgrade database
(venv) $ python manage.py db upgrade
User Profile Page
In [ ]:
# app/main/views.py
from flask import render_template, abort
#...
#...
from ..models import Permission, User
#...
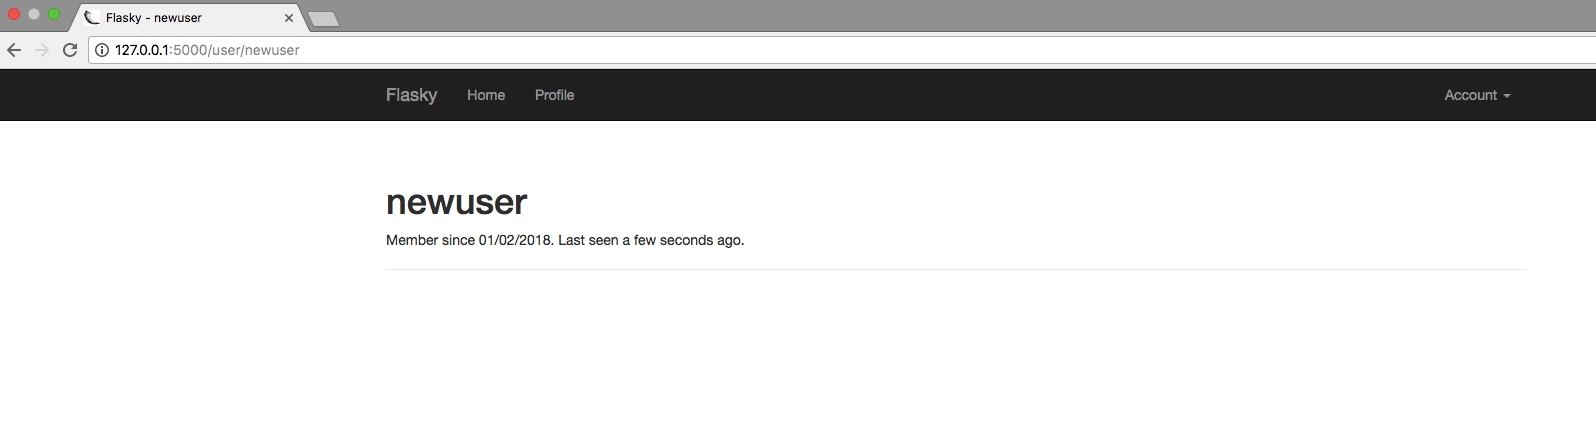
@main.route('/user/<username>')
def user_profile(username):
user = User.query.filter_by(username=username).first()
if user is None:
abort(404)
return render_template('user.html', user=user)
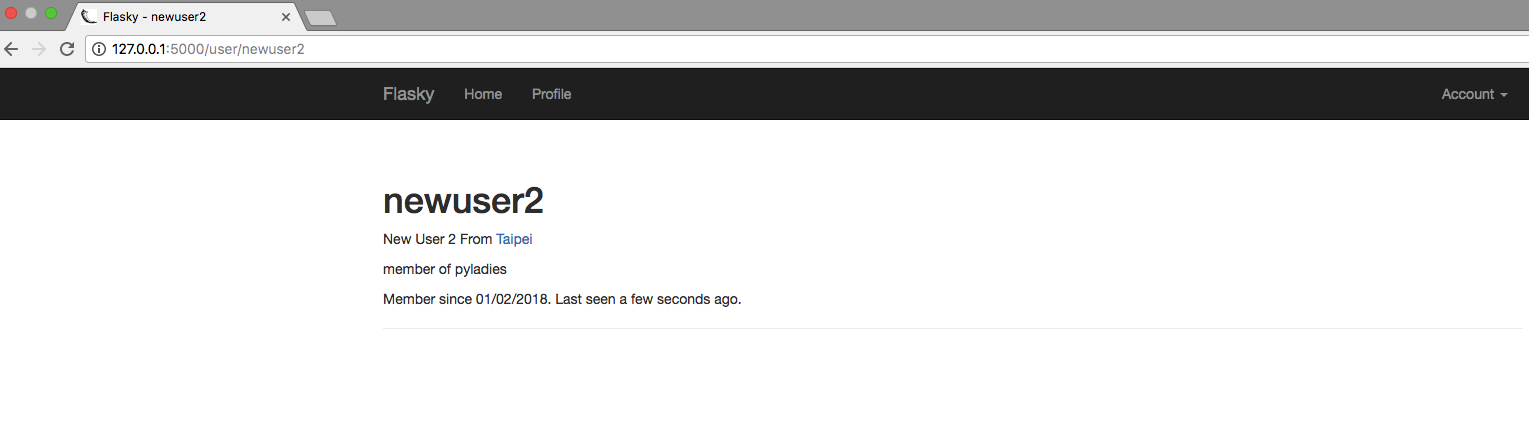
User profile template
In [ ]:
<!-- app/templates/user.html -->
{% extends "base.html" %}
{% block title %}Flasky - {{ user.username }}{% endblock %}
{% block scripts %}
{{ super() }}
{{ moment.include_moment() }}
{% endblock %}
{% block page_content %}
<div class="page-header">
<h1>{{ user.username }}</h1>
{% if user.name or user.location %}
<p>
{% if user.name %}{{ user.name }}{% endif %}
{% if user.location %}
From <a href="http://maps.google.com/?q={{ user.location }}">
{{ user.location }}
</a>
{% endif %}
</p>
{% endif %}
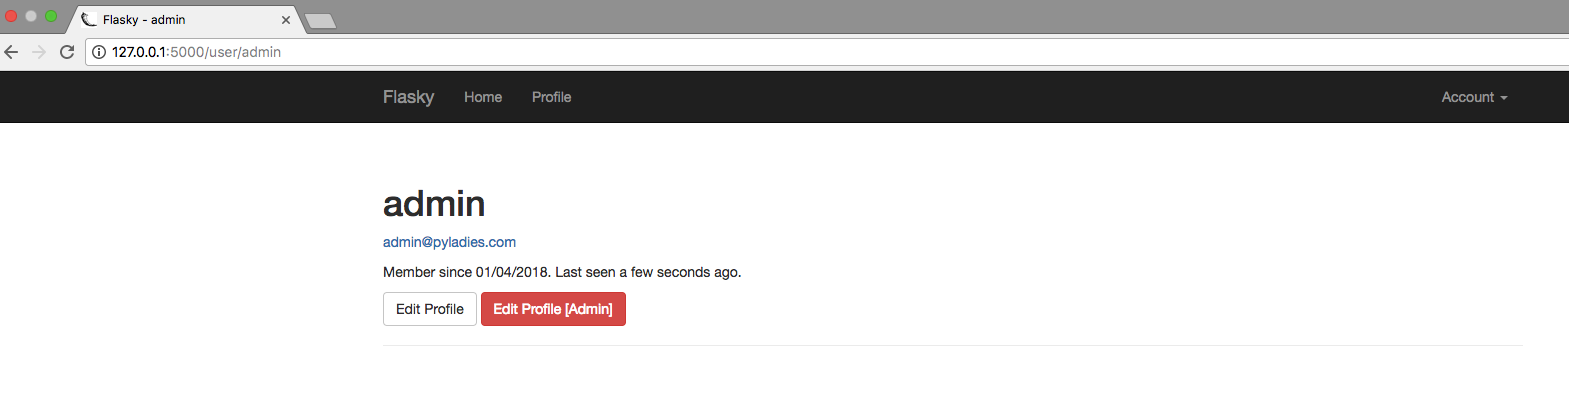
{% if current_user.is_administrator() %}
<p><a href="mailto:{{ user.email }}">{{ user.email }}</a></p>
{% endif %}
{% if user.about_me %}<p>{{ user.about_me }}</p>{% endif %}
<p>
Member since {{ moment(user.member_since).format('L') }}.
Last seen {{ moment(user.last_seen).fromNow() }}.
</p>
</div>
{% endblock %}
Add link to profile page to the navigation bar.
- Most users will want easy access to their own profile page.
- Add the profile page link to the navigation bar in the
base.html.- The conditional check (
is_authenticated) is necessary because the navigation bar is also rendered for non-authenticated users.
- The conditional check (
In [ ]:
<!-- app/templates/base.html -->

...
{% block navbar %}
<div class="navbar navbar-inverse" role="navigation">
    <div class="container">
        ...
        <div class="navbar-collapse collapse">
            <ul class="nav navbar-nav">
                ...
                {% if current_user.is_authenticated %}
                <li><a href="{{ url_for('main.user_profile', username=current_user.username) }}">Profile</a></li>
                {% endif %}
            </ul>
...
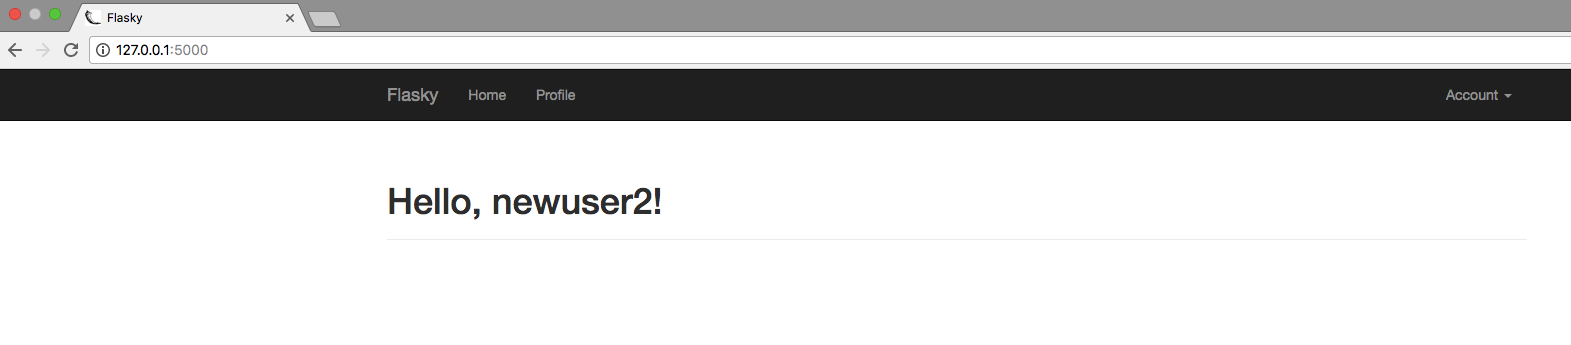
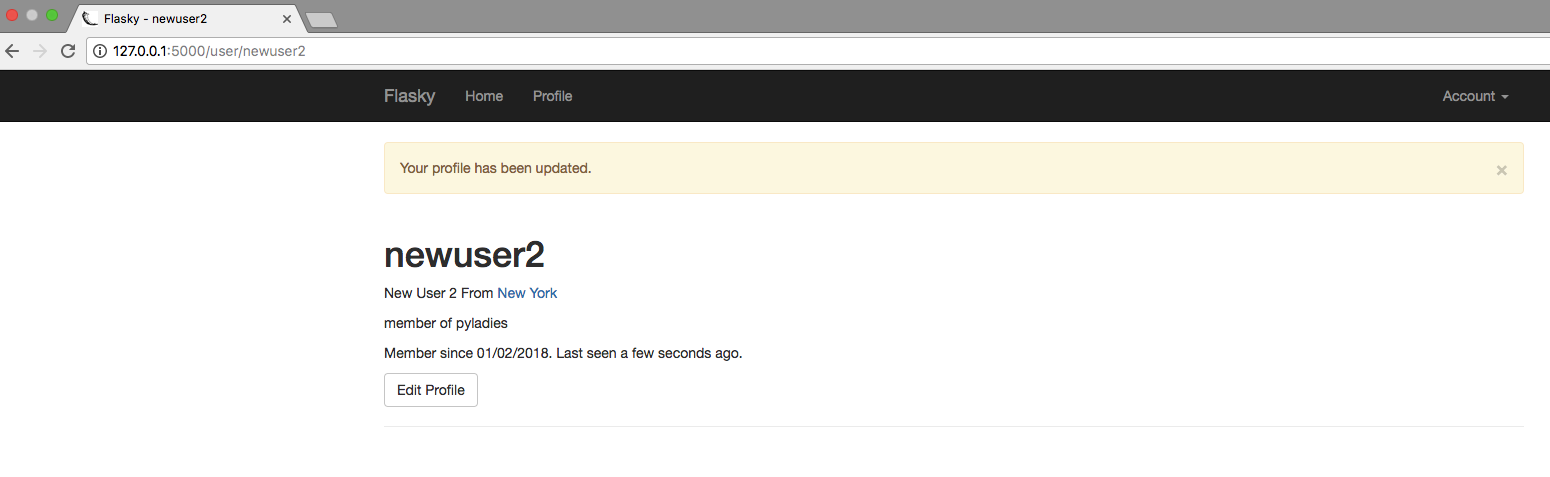
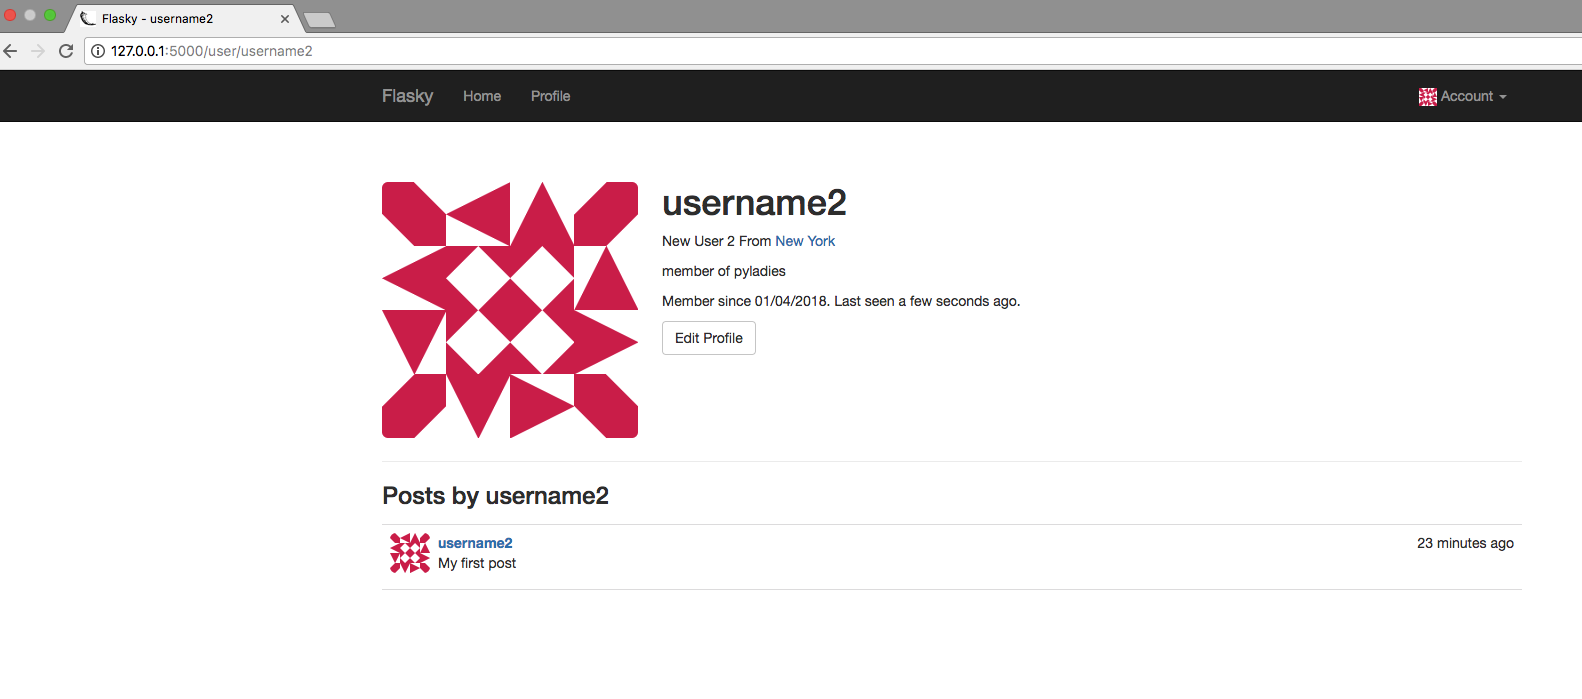
Create a new user using shell and add location and about_me information
(venv) $ python manage.py shell
>>> u = User(username='newuser2', email='newuser2@pyladies.com', password='123456', confirmed=True, name='New User 2', location='Taipei', about_me='member of pyladies')
>>> db.session.add(u)
>>> db.session.commit()

You can get the above code from github
$git clone https://github.com/win911/flask_class.git- Skip this if you have done it before.
$git checkout 10a- If any error occurs, do "$ git pull origin master" first.
Remember to upgrade your DB
$python manage.py db upgrade
Profile Editor
- User-Level profile editor
- Administrator-Level profile editor
User-Level Profile Editor
- A page where users can enter information about themselves to present in their profile pages.
- Add a profile edit form to allow users to change their profile information.
- All the fields in the form are optional, the length validator allows a length of zero.
In [ ]:
# app/main/forms.py

from flask_wtf import FlaskForm
from wtforms import StringField, SubmitField, TextAreaField
from wtforms.validators import Required, Length

# ...
class EditProfileForm(FlaskForm):
    name = StringField('Real name', validators=[Length(0, 64)])
    location = StringField('Location', validators=[Length(0, 64)])
    about_me = TextAreaField('About me')
    submit = SubmitField('Submit')
Profile edit route
- The view function sets initial values for all the fields before presenting the form.
- When the form is submitted, the data is then updated.
In [ ]:
# app/main/views.py

from flask import render_template, abort, flash, redirect, url_for
from flask_login import login_required, current_user

#...
from .forms import EditProfileForm
from .. import db

#...

@main.route('/edit-profile', methods=['GET', 'POST'])
@login_required
def edit_profile():
    form = EditProfileForm()
    if form.validate_on_submit():
        current_user.name = form.name.data
        current_user.location = form.location.data
        current_user.about_me = form.about_me.data
        db.session.add(current_user)
        flash('Your profile has been updated.')
        return redirect(url_for('.user_profile', username=current_user.username))
    form.name.data = current_user.name
    form.location.data = current_user.location
    form.about_me.data = current_user.about_me
    return render_template('edit_profile.html', form=form)
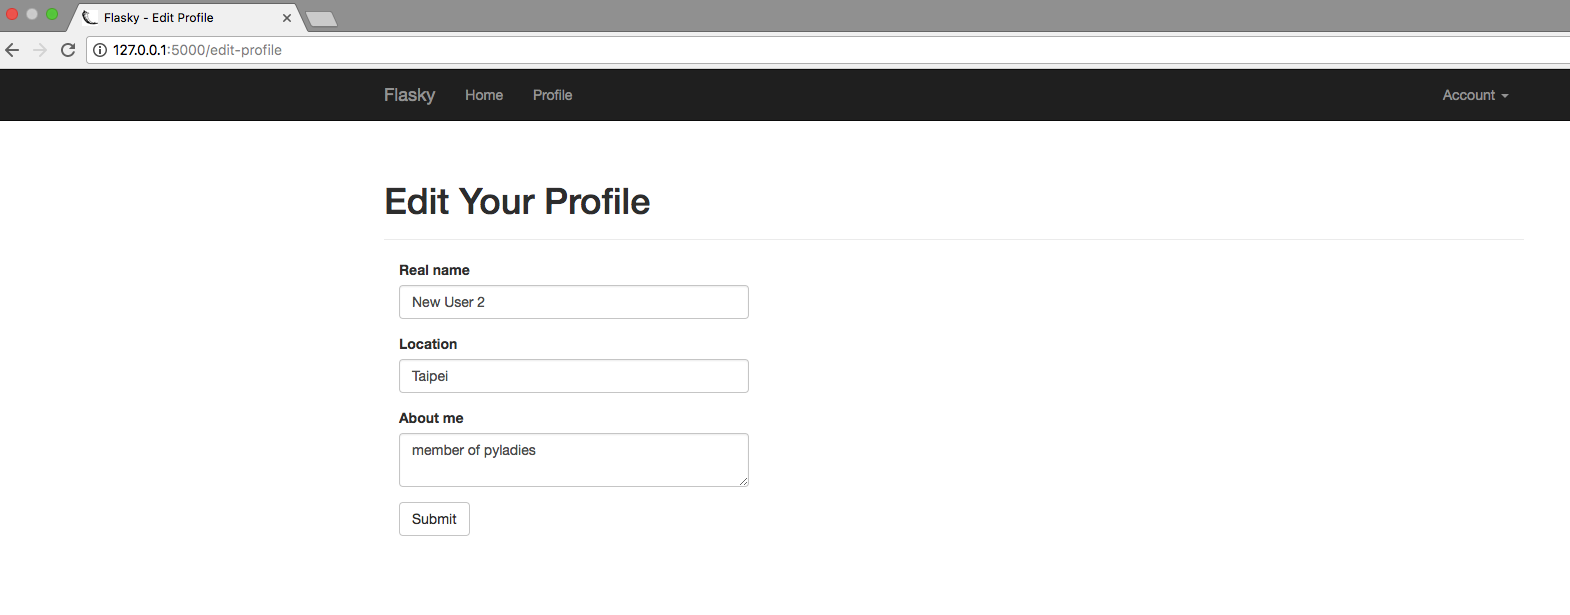
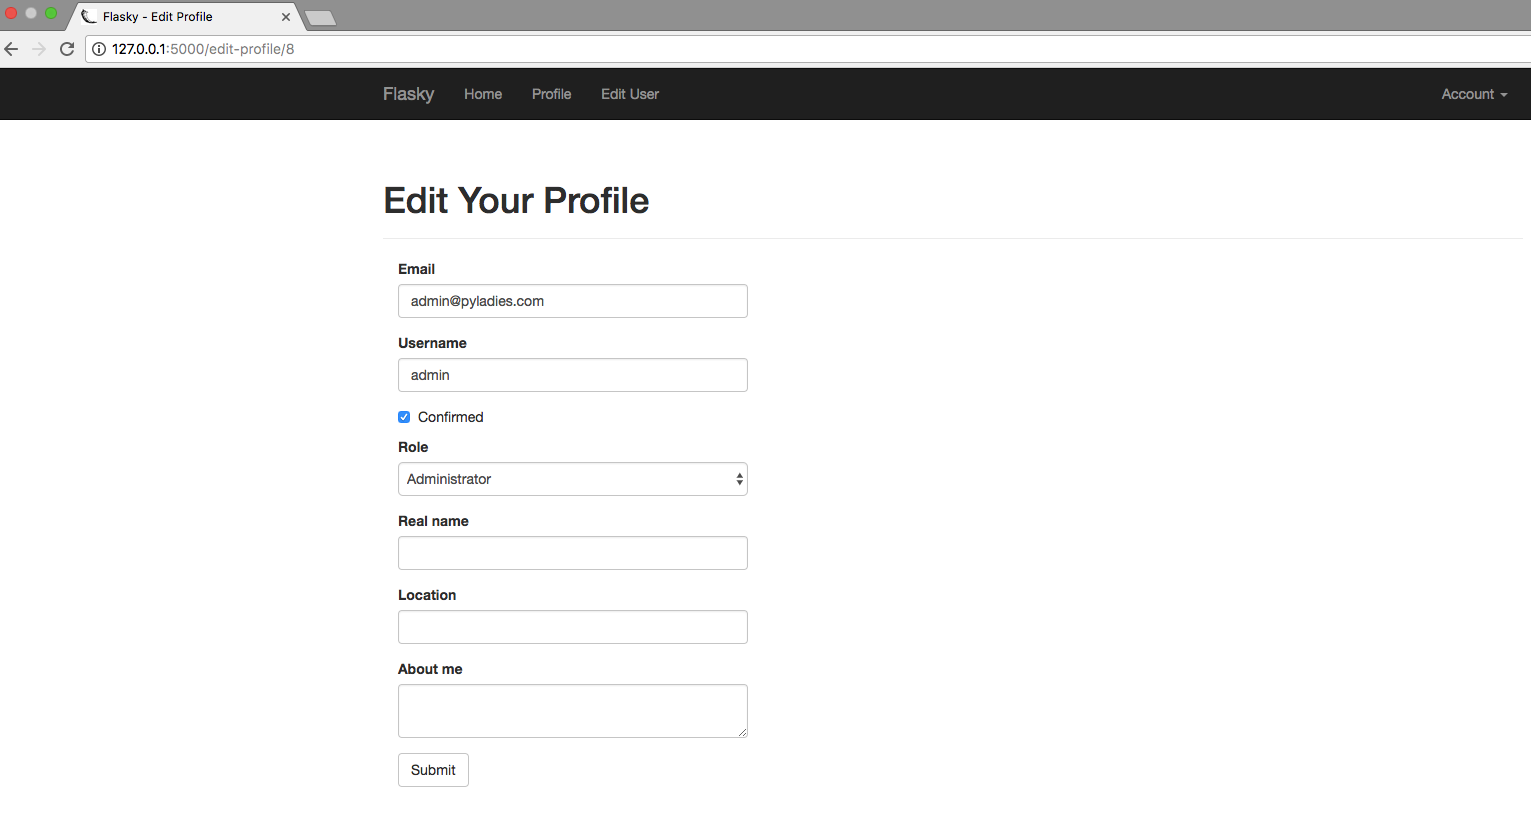
Profile edit template
In [ ]:
<!-- app/templates/edit_profile.html -->

{% extends "base.html" %}
{% import "bootstrap/wtf.html" as wtf %}

{% block title %}Flasky - Edit Profile{% endblock %}

{% block page_content %}
<div class="page-header">
    <h1>Edit Your Profile</h1>
</div>
<div class="col-md-4">
    {{ wtf.quick_form(form) }}
</div>
{% endblock %}
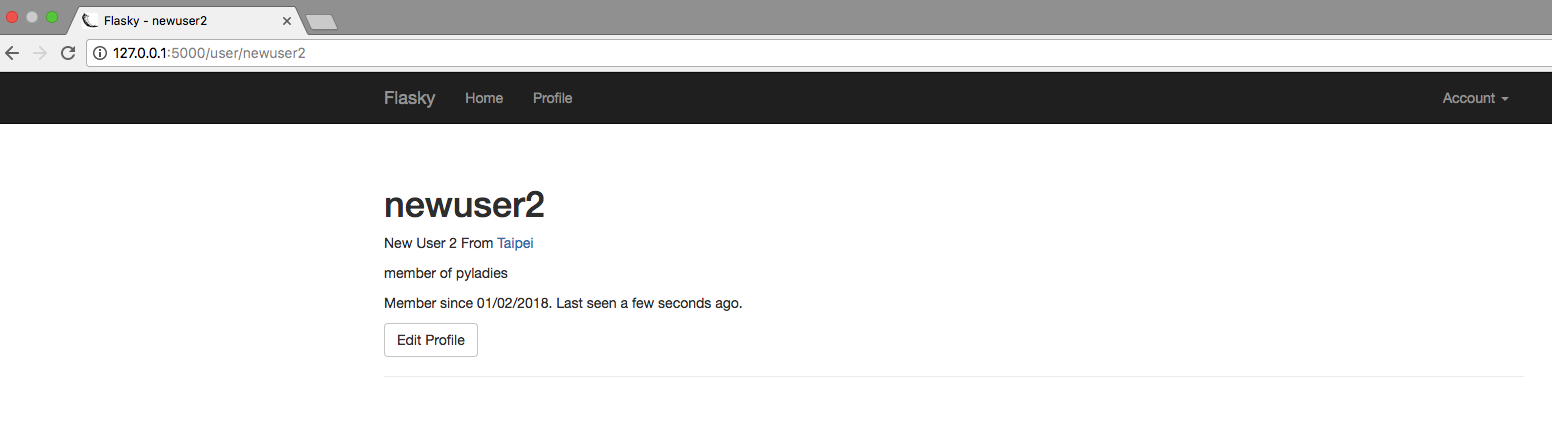
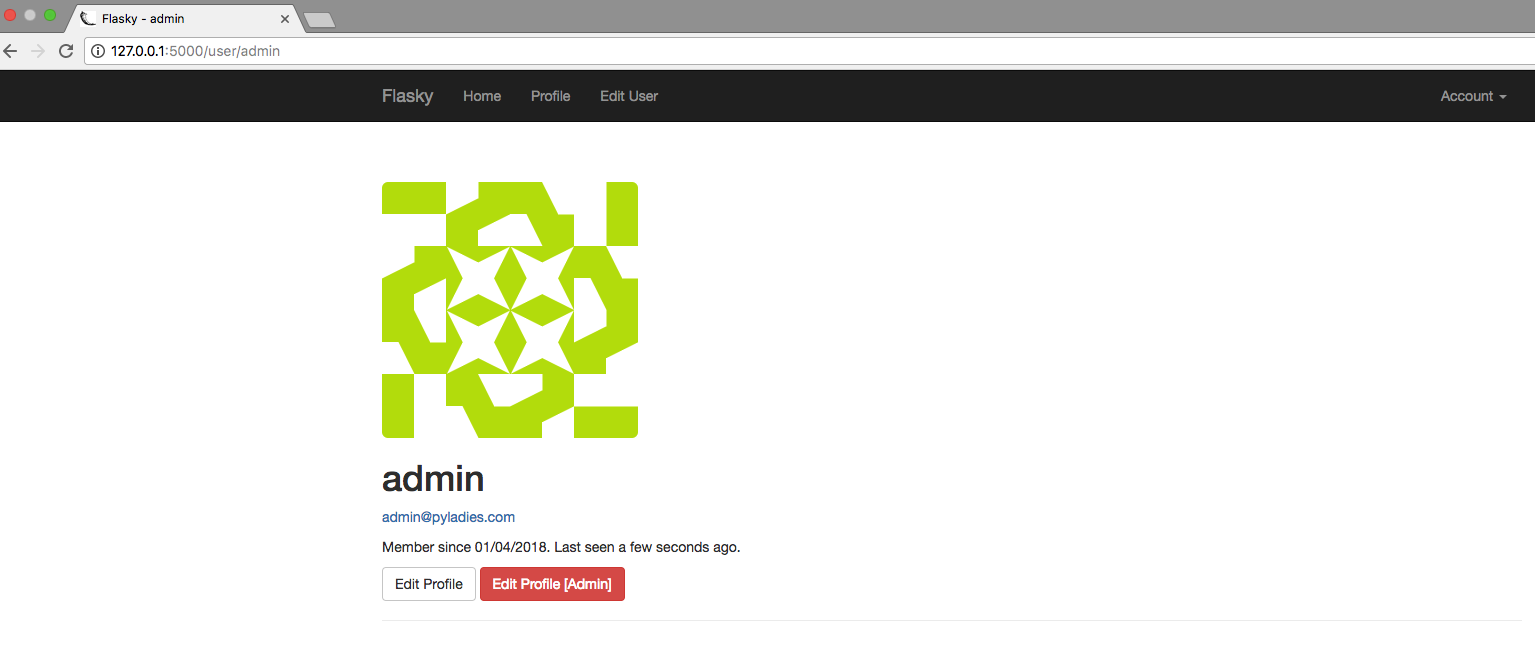
Add profile edit link to the profile page
- To make it easy for users to reach this page, a direct link can be added in the profile page
In [ ]:
<!-- app/templates/user.html -->

...

{% block page_content %}
    ...
    <p>
        Member since {{ moment(user.member_since).format('L') }}.
        Last seen {{ moment(user.last_seen).fromNow() }}.
    </p>
    <p>
        {% if user == current_user %}
        <a class="btn btn-default" href="{{ url_for('.edit_profile') }}">
         Edit Profile
        </a>
        {% endif %}
    </p>
</div>
{% endblock %}
You can get the above code from github
$git clone https://github.com/win911/flask_class.git- Skip this if you have done it before.
$git checkout 10b- If any error occurs, do "$ git pull origin master" first.
Administrator-Level Profile Editor
- Let administrators edit the profile of any users
- The personal information items
- Other fields in the User model to which users have no direct access such as the user role
Profile editing form for administrator
In [ ]:
# app/main/forms.py

from flask_wtf import FlaskForm
from wtforms import StringField, SubmitField, TextAreaField, BooleanField, SelectField
from wtforms.validators import Required, Length, Email, Regexp
from wtforms import ValidationError

from ..models import Role, User

#...

class EditProfileAdminForm(FlaskForm):
    email = StringField('Email', validators=[Required(), Length(1, 64), Email()])
    username = StringField('Username', validators=[
                Required(), Length(1, 64), Regexp('^[A-Za-z][A-Za-z0-9_.]*$', 0,
                'Usernames must have only letters, numbers, dots or underscores')])
    confirmed = BooleanField('Confirmed')
    role = SelectField('Role', coerce=int)
    name = StringField('Real name', validators=[Length(0, 64)])
    location = StringField('Location', validators=[Length(0, 64)])
    about_me = TextAreaField('About me')
    submit = SubmitField('Submit')
SelectField
- WTForm’s wrapper for the
<select>HTML form control, which implements a dropdown list - Must have the items set in its
choicesattribute- Must be given as a list of tuples, with each tuple consisting of two values
- An identifier for the item
- The text to show in the control as a string
- Must be given as a list of tuples, with each tuple consisting of two values
Note: a coerce=int argument is added to the SelectField constructor
- To store the field values as integers instead of the default, which is strings
- Because the identifier for each tuple is set to the id of each role, and these are integers
In [ ]:
# app/main/forms.py

#...

class EditProfileAdminForm(FlaskForm):
     #...

    def __init__(self, user, *args, **kwargs):
        super(EditProfileAdminForm, self).__init__(*args, **kwargs)

        self.role.choices = [(role.id, role.name) for role in Role.query.order_by(Role.name).all()]
        self.user = user

    def validate_email(self, field):
        if field.data != self.user.email and User.query.filter_by(email=field.data).first():
            raise ValidationError('Email already registered.')

    def validate_username(self, field):
        if field.data != self.user.username and User.query.filter_by(username=field.data).first():
            raise ValidationError('Username already in use.')
The validation for email and username fields requires some careful handling
- First check whether a change to the field was made.
- When there is a change, ensure that the new value does not duplicate another user’s.
- When the fields are not changed, the validation should pass.
- To validate the information, the form's constructor receives the user obejct as an argument and asves it as a member variable.
Profile edit route for administrators
- The user is given by its
id, so Flask-SQLALchemy'sget_or_404()convenience function is used. - If the
idis invalid, the request will return a code404error. - When seeting the initial value for the
rolefield, therole_idis used because thechoicesattribute uses the numeric identifiers.
In [ ]:
# app/main/views.py
#...
from .forms import EditProfileForm, EditProfileAdminForm
from ..models import Permission, User, Role
#...
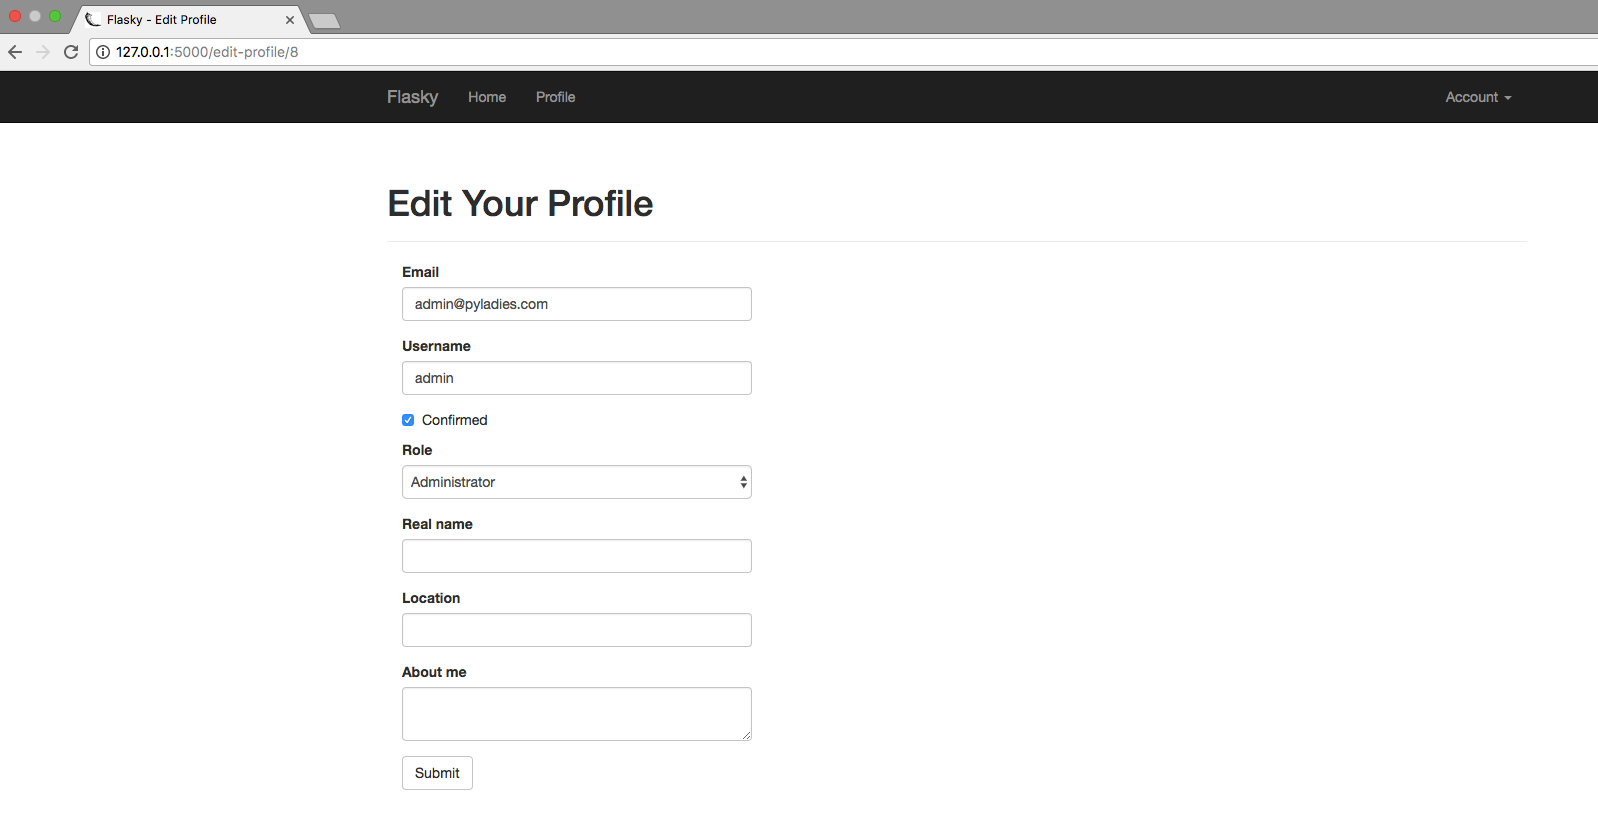
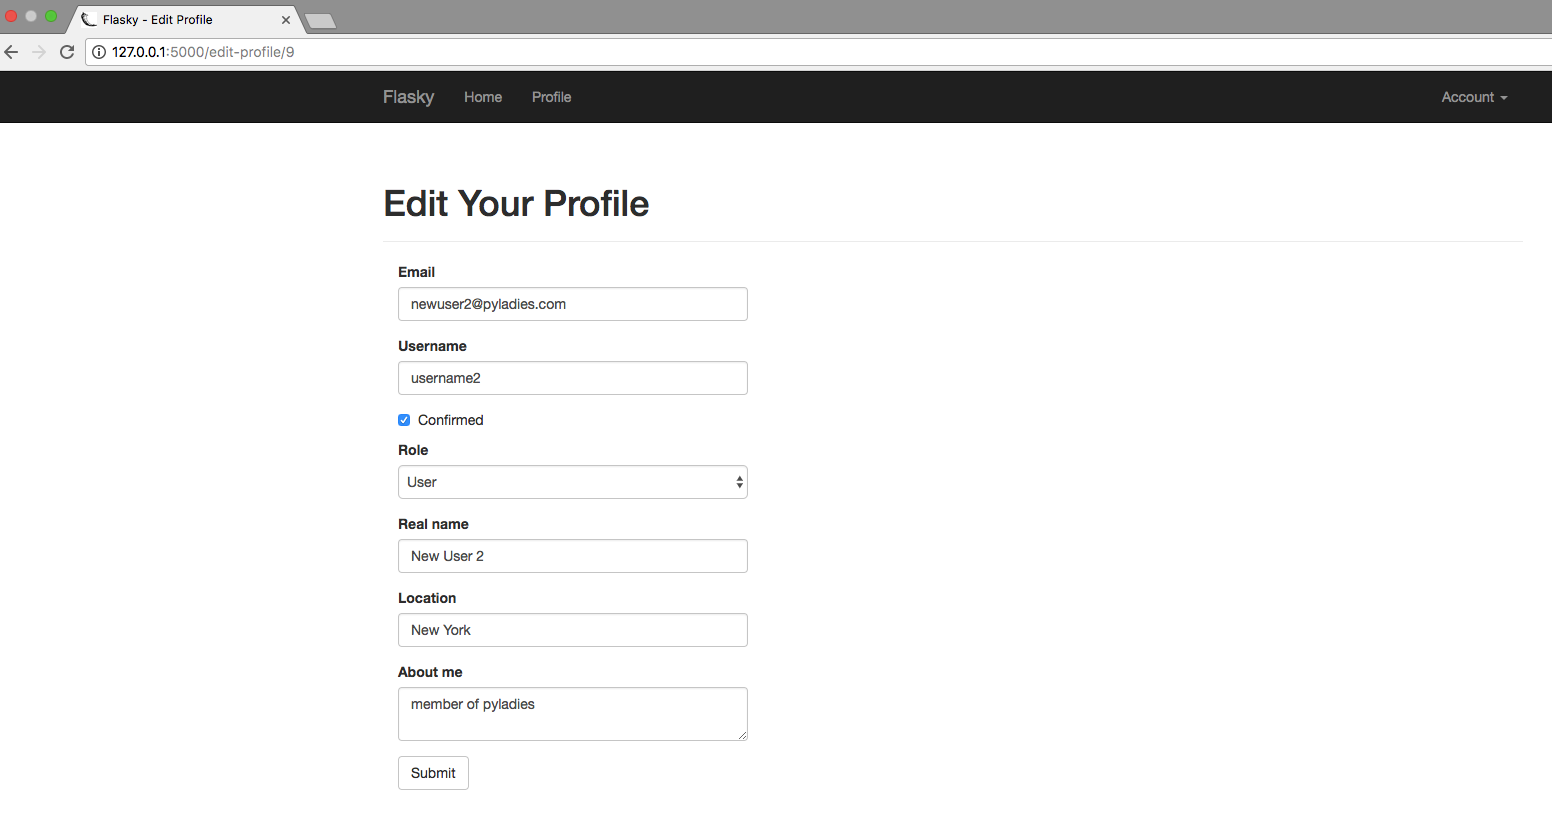
@main.route('/edit-profile/<int:id>', methods=['GET', 'POST'])
@login_required
@admin_required
def edit_profile_admin(id):
user = User.query.get_or_404(id)
form = EditProfileAdminForm(user=user)
if form.validate_on_submit():
user.email = form.email.data
user.username = form.username.data
user.confirmed = form.confirmed.data
user.role = Role.query.get(form.role.data)
user.name = form.name.data
user.location = form.location.data
user.about_me = form.about_me.data
db.session.add(user)
flash('The profile has been updated.')
return redirect(url_for('.user_profile', username=user.username))
form.email.data = user.email
form.username.data = user.username
form.confirmed.data = user.confirmed
form.role.data = user.role_id
form.name.data = user.name
form.location.data = user.location
form.about_me.data = user.about_me
return render_template('edit_profile.html', form=form)
To link to this page, another button is added in the user profile page
In [ ]:
<!-- app/templates/user.html -->

...

{% block page_content %}
    ...
    <p>
        {% if user == current_user %}
        <a class="btn btn-default" href="{{ url_for('.edit_profile') }}">
         Edit Profile
        </a>
        {% endif %}
        {% if current_user.is_administrator() %}
        <a class="btn btn-danger" href="{{ url_for('.edit_profile_admin', id=user.id) }}">
        Edit Profile [Admin]
        </a>
        {% endif %}
    </p>
</div>
{% endblock %}
You can get the above code from github
$git clone https://github.com/win911/flask_class.git- Skip this if you have done it before.
$git checkout 10c- If any error occurs, do "$ git pull origin master" first.
Change the user to access user's profile
- If the admin wants to change a user's profile, he/she needs to change the url himself/herself.
- We haven't implemented a form to let admin choose which user he/she wish to edit.
- When the amdin is editing other user's profile, the heading should change according to the user's name.
- e.g. Edit Alicia's Profile not Edit Your Profile
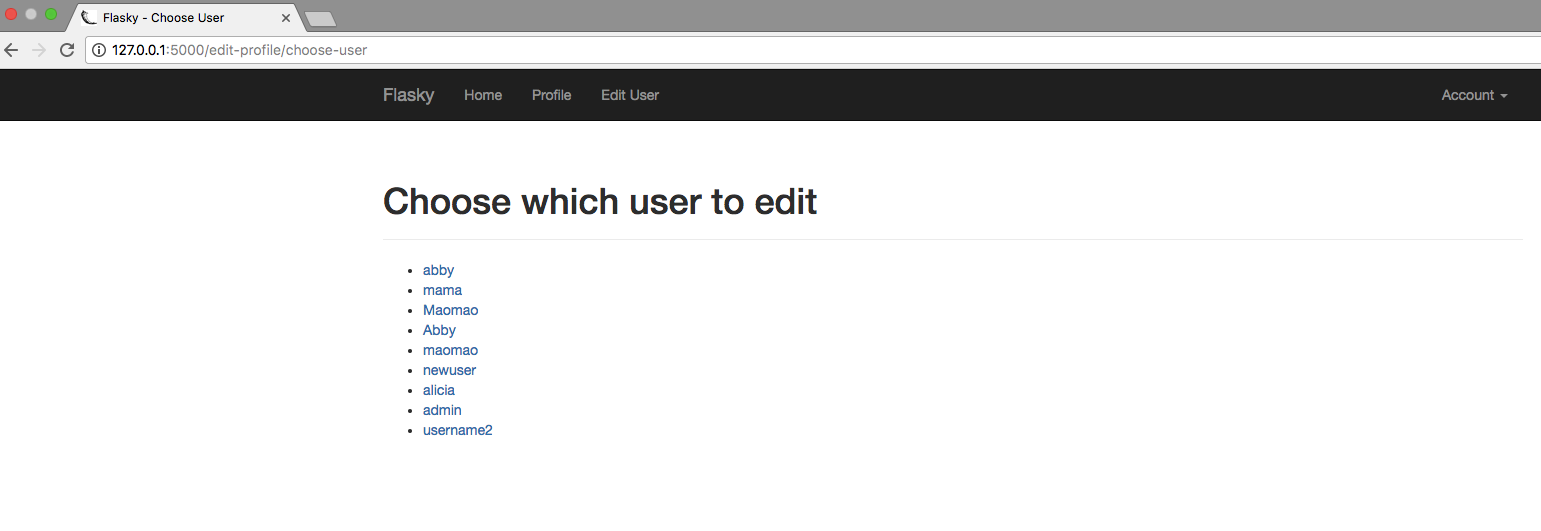
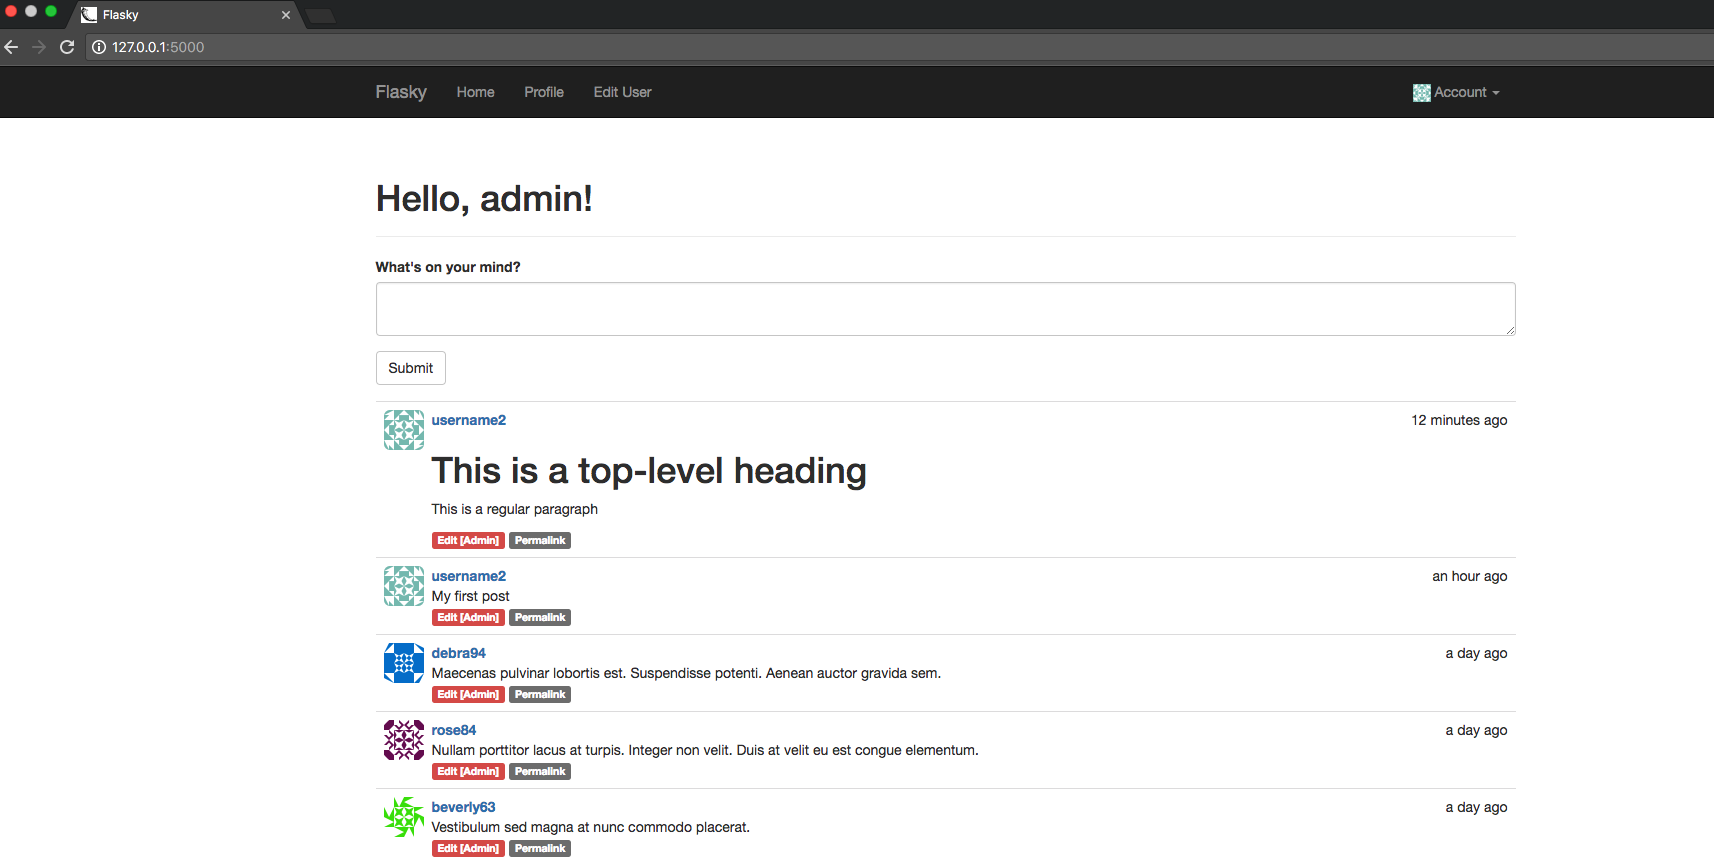
Coding Time: Let admin choose which user profile to edit.
Expected Result: Edit User link for admin
Expected Result:
Expected Result: Admin's own edit profile page
Steps
1. Add a new routing: /edit_profile/choose-user
In [ ]:
# app/main/views.py

# ...
@main.route('/edit-profile/choose-user', methods=['GET', 'POST'])
@login_required
@admin_required
def choose_user():
    users = User.query.all()
    return render_template('choose_user.html', users=users)
2. Add a new template: choose_user.html
In [ ]:
<!-- app/templates/choose_user.html -->

{% extends "base.html" %}
{% import "bootstrap/wtf.html" as wtf %}

{% block title %}Flasky - Choose User{% endblock %}

{% block page_content %}
<div class="page-header">
    <h1>Choose which user to edit</h1>
</div>
<ul class="posts">
    {% for user in users %}
    <li>
    <a href="{{ url_for('.user_profile', username=user.username) }}">{{ user.username }}</a>
    {% endfor %}
</ul>
{% endblock %}
3. Add a new link on navigation bar: Edit User
In [ ]:
<!-- app/templates/base.html -->

...

{% block navbar %}
<div class="navbar navbar-inverse" role="navigation">
    ...
        <div class="navbar-collapse collapse">
            <ul class="nav navbar-nav">
                <li><a href="{{ url_for('main.index') }}">Home</a></li>
                {% if current_user.is_authenticated %}
                <li><a href="{{ url_for('main.user_profile', username=current_user.username) }}">Profile</a></li>
                {% endif %}
                {% if current_user.is_administrator() %}
                <li><a href="{{ url_for('main.choose_user') }}">Edit User</a></li>
                {% endif %}
        </ul>
        ...
4. Modify edit-profile.html to customize heading
In [ ]:
<!-- app/templates/edit_profile.html -->

...
{% block page_content %}
<div class="page-header">
    {% if user == current_user %}
    <h1>Edit Your Profile</h1>
    {% else %}
    <h1>Edit {{ user.username }}'s Profile</h1>
    {% endif %}
</div>
...
In [ ]:
# app/main/views.py

# ...
@main.route('/edit-profile', methods=['GET', 'POST'])
@login_required
def edit_profile():
    # ...
    return render_template('edit_profile.html', form=form, user=current_user)


@main.route('/edit-profile/<int:id>', methods=['GET', 'POST'])
@login_required
@admin_required
def edit_profile_admin(id):
    # ...
    return render_template('edit_profile.html', form=form, user=user)
You can get the above code from github
$git clone https://github.com/win911/flask_class.git- Skip this if you have done it before.
$git checkout 10d- If any error occurs, do "$ git pull origin master" first.
User Avatars
The look of the profile pages can be improved by showing avatar pictures of users
- In this section, you will learn how to add user avatars provided by Gravatar
- Gravatar associates avatar images with email addresses
- The avatar URLs are then generated by appending the MD5 hash to URL http://www.gravatar.com/avatar/ or https://secure.gravatar.com/avatar/
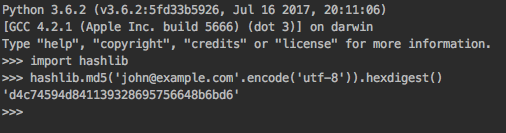
- To generate the avatar URL for a given email address, its MD5 hash is calculated
(venv) $ python
>>> import hashlib
>>> hashlib.md5('john@example.com'.encode('utf-8')).hexdigest()
'd4c74594d841139328695756648b6bd6'
Generate avatar URL
- The avatar URls are generated by appending the MD5 hash to URL
http:// www.gravatar.com/avatar/orhttps://secure.gravatar.com/avatar/.- e.g. Avatar URL for
john@example.com: http://www.gravatar.com/avatar/d4c74594d841139328695756648b6bd6
- e.g. Avatar URL for
- The query string of the URL can include other arguments that configure the avatar image.
Gravatar query string arguments
| Argument name | Description |
|---|---|
| s | Image size, in pixels. |
| r | Image rating. Options are "g", "pg", "r", and "x". |
| d | The default image generator for users who have no avatars registered with the Gravatar service. Options are "404"to return a 404 error,a URL that points to a default image, or one of the following image generators: "mm", "identicon", "monsterid", "wavatar", "retro", or "blank". |
| fd | Force the use of default avatars. |
Add Gravatar URL to the User model
In [ ]:
# app/models.py

#...
import hashlib

from flask import current_app, request
#...

class User(UserMixin, db.Model):
    #...

    def gravatar(self, size=100, default='identicon', rating='g'):
        if request.is_secure:
            url = 'https://secure.gravatar.com/avatar'
        else:
            url = 'http://www.gravatar.com/avatar'

        hash_value = hashlib.md5(self.email.encode('utf-8')).hexdigest()
        return '{url}/{hash}?s={size}&d={default}&r={rating}'.format(
                url=url, hash=hash_value, size=size, default=default, rating=rating)
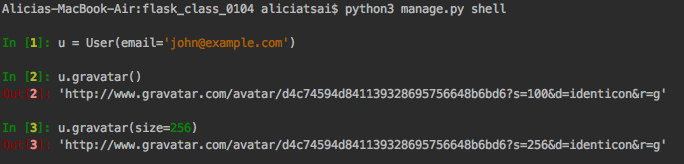
Generate Gravatar URL from shell
(venv) $ python manage.py shell
>>> u = User(email='john@example.com')
>>> u.gravatar()
'http://www.gravatar.com/avatar/d4c74594d84113932869575bd6?s=100&d=identicon&r=g'
>>> u.gravatar(size=256)
'http://www.gravatar.com/avatar/d4c74594d84113932869575bd6?s=256&d=identicon&r=g'
Add user's avatar in the profile page
In [ ]:
<!-- app/tempaltes/user.html -->

...

{% block page_content %}
<div class="page-header">
    <img class="img-rounded profile-thumbnail" src="{{ user.gravatar(size=256) }}">
    <div class="profile-header">
        <h1>{{ user.username }}</h1>
        ...
    </div>
</div>
{% endblock %}
Add a small thumbnail image in the navigation bar
In [ ]:
<!-- app/templates/base.html -->

...
{% block head %}
{{ super() }}
...
<link rel="stylesheet" type="text/css" href="{{ url_for('static', filename='styles.css') }}">
{% endblock %}

{% block navbar %}
<div class="navbar navbar-inverse" role="navigation">
    ...
        <div class="navbar-collapse collapse">
            ...
            <ul class="nav navbar-nav navbar-right">
                {% if current_user.is_authenticated %}
                <li class="dropdown">
                    <a href="#" class="dropdown-toggle" data-toggle="dropdown">
                        <img src="{{ current_user.gravatar(size=18) }}">
                        Account <b class="caret"></b>
                    </a>
                    ...
Add a custom CSS classes in app/static/styles.css
In [ ]:
/* app/static/styles.css */

.profile-thumbnail {
    position: absolute;
}
.profile-header {
    min-height: 260px;
    margin-left: 280px;
}
Cache MD5 hash in the User model
- The MD5 hash for a user's email will remain constant
- Generating MD5 hash is a CPU-intensive operation
- If a large number of avatars need to be generated for a page, then the computational work can be significant
In [ ]:
# app/models.py

#...

class User(UserMixin, db.Model):
    #...
    avatar_hash = db.Column(db.String(32))

    def __init__(self, **kwargs):
        #...
        if self.email is not None and self.avatar_hash is None:
            self.avatar_hash = self.gravatar_hash()

    def change_email(self, token):
        #...
        self.email = new_email
        self.avatar_hash = self.gravatar_hash()
        db.session.add(self)
        return True

    #...
Use stored hash value
In [ ]:
# app/models.py

#...
class User(UserMixin, db.Model):
    #...
    def gravatar_hash(self):
        return hashlib.md5(self.email.lower().encode('utf-8')).hexdigest()

    def gravatar(self, size=100, default='identicon', rating='g'):
        if request.is_secure:
            url = 'https://secure.gravatar.com/avatar'
        else:
            url = 'http://www.gravatar.com/avatar'

        hash_value = self.avatar_hash or self.gravatar_hash()
        return '{url}/{hash}?s={size}&d={default}&r={rating}'.format(
            url=url, hash=hash_value, size=size, default=default, rating=rating)
Upgrade database
(venv) $ python manage.py db upgrade
You can get the above code from github
$git clone https://github.com/win911/flask_class.git- Skip this if you have done it before.
$git checkout 10e- If any error occurs, do "$ git pull origin master" first.
Remember to upgrade your DB
$python manage.py db upgrade
Ch11: Blog Posts
We will learn a few new techniques: reuse of templates, pagination of longlists of items, and working with rich text.
Blog Post Submission and Display
Add new Post model to represent blog posts
- The
Postmodel has a one-to-many relationship from theUsermodel. - The
bodyfield is defined with typedb.Text, which has no limitation on the length.
In [ ]:
# app/models.py

#...

class Post(db.Model):
    __tablename__ = 'posts'
    id = db.Column(db.Integer, primary_key=True)
    body = db.Column(db.Text)
    timestamp = db.Column(db.DateTime, index=True, default=datetime.utcnow)
    author_id = db.Column(db.Integer, db.ForeignKey('users.id'))

class User(UserMixin, db.Model):
    #...
    posts = db.relationship('Post', backref='author', lazy='dynamic')
Upgrade database
(venv) $ python manage.py db upgrade
Blog post form
- Create a form in the main page that allows users to write and submit the post.
In [ ]:
# app/main/forms.py

#...

class PostForm(FlaskForm):
    body = TextAreaField("What's on your mind?", validators=[Required()])
    submit = SubmitField('Submit')
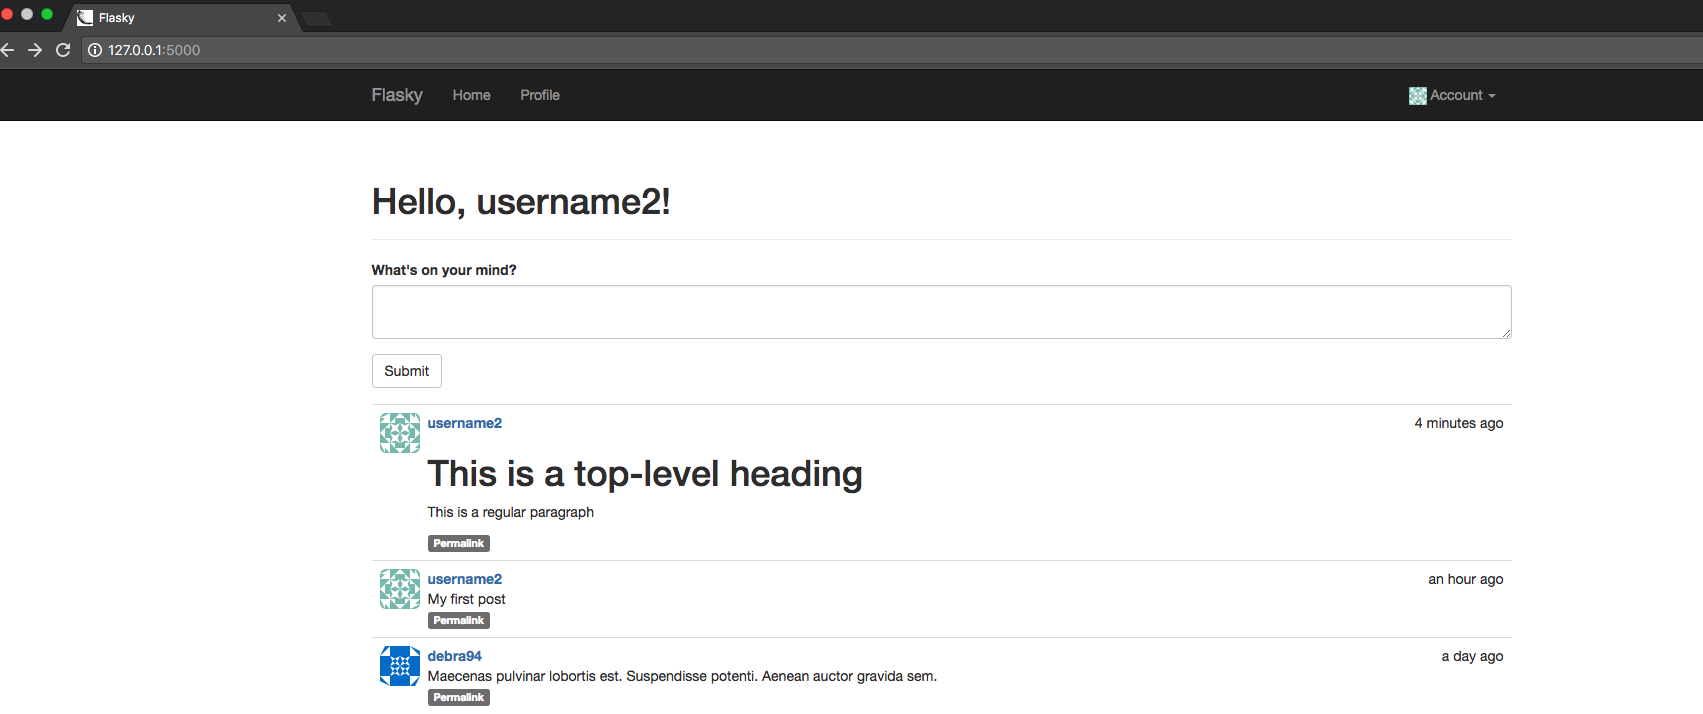
Blog posts in the view function
- The
index()view function handles the blog post form and passes the list of old blog posts to the template.- Check the current user's permission to write articles before allowing the new post.
- The list of posts is ordered by their timestamp in descending order.
- Note: The
current_uservariable from Flask-Login is a wrapper that contains the acutal user object inside.- The database needs a real user object, so we need to call
_get_current_object().
- The database needs a real user object, so we need to call
In [ ]:
# app/main/views.py

from .forms import EditProfileForm, EditProfileAdminForm, PostForm
from ..models import Permission, Role, User, Post

#...

@main.route('/', methods=['GET', 'POST'])
def index():
    form = PostForm()
    if current_user.can(Permission.WRITE_ARTICLES) and form.validate_on_submit():
        post = Post(body=form.body.data, author=current_user._get_current_object())
        db.session.add(post)
        return redirect(url_for('.index'))
    posts = Post.query.order_by(Post.timestamp.desc()).all()
    return render_template('index.html', form=form, posts=posts)
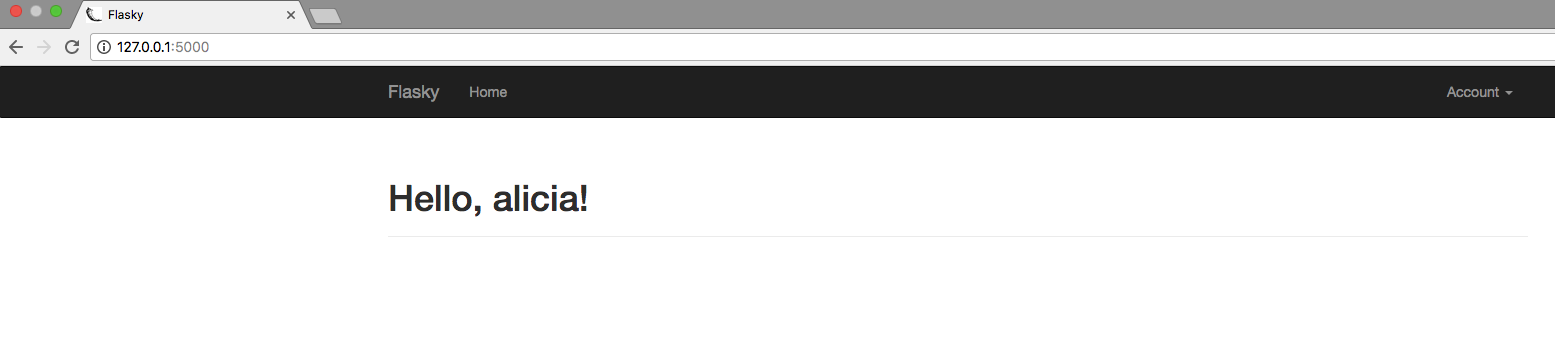
Home page template with blog post form
- Render the blog post form below the greeting in the
index.htmltemplate.- The
User.can()is used to skip the blog post form for users who do not have theWRITE_ARTICLESpermission.
- The
- All the blot posts in the database are listed in chronological order from newest to oldest.
- The CSS styles used are stored in a
styles.cssfile in theapp/staticfolder.
In [ ]:
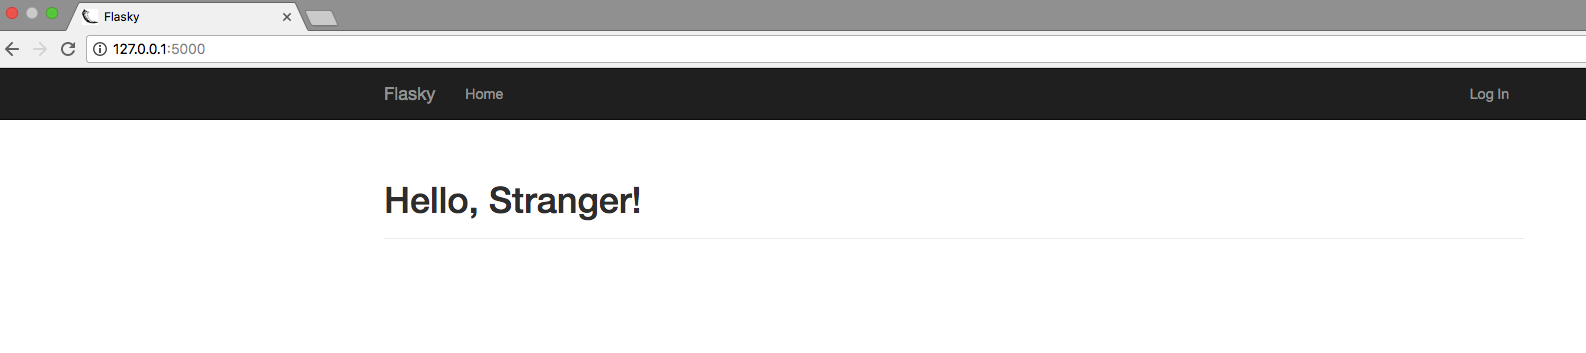
<!-- app/tempaltes/index.html -->
{% extends "base.html" %}
{% import "bootstrap/wtf.html" as wtf %}
{% block title %}Flasky{% endblock %}
{% block page_content %}
<div class="page-header">
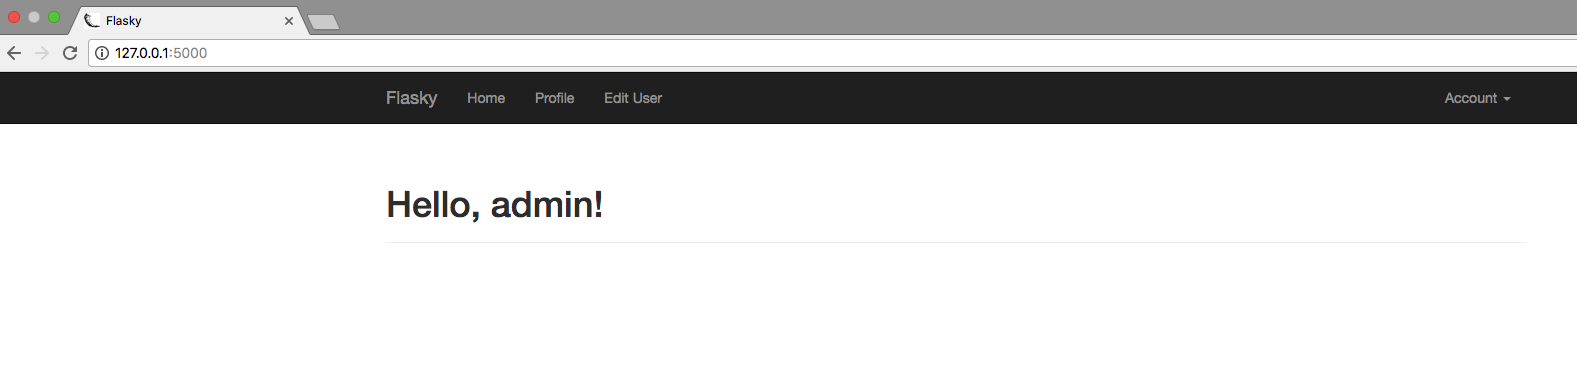
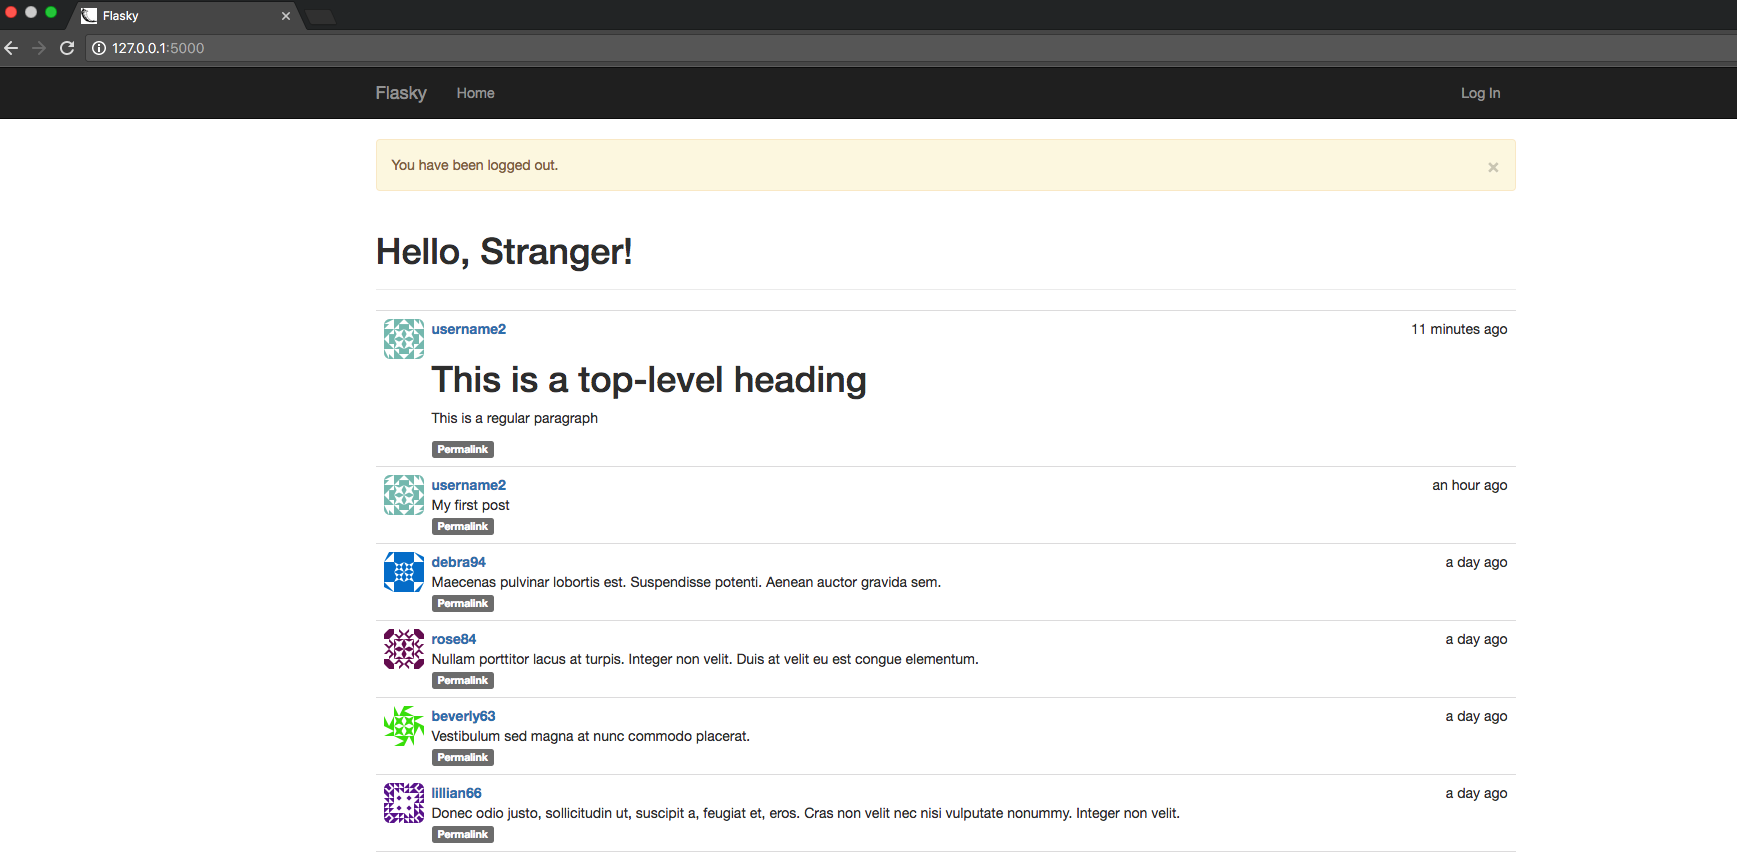
<h1>Hello, {% if current_user.is_authenticated %}{{ current_user.username }}{% else %}Stranger{% endif %}!</h1>
</div>
<div>
{% if current_user.can(Permission.WRITE_ARTICLES) %}
{{ wtf.quick_form(form) }}
{% endif %}
</div>
...
Home page template with lists of posts
In [ ]:
<!-- app/tempaltes/index.html -->

...

<ul class="posts">
    {% for post in posts %}
    <li class="post">
        <div class="profile-thumbnail">
            <a href="{{ url_for('.user_profile', username=post.author.username) }}">
            <img class="img-rounded profile-thumbnail" src="{{ post.author.gravatar(size=40) }}">
            </a>
        </div>
        <div class="post-content">
            <div class="post-date">{{ moment(post.timestamp).fromNow() }}</div>
            <div class="post-author"><a href="{{ url_for('.user_profile', username=post.author.username) }}">{{ post.author.username }}</a></div>
            <div class="post-body">{{ post.body }}</div>
        </div>
    </li>
    {% endfor %}
</ul>
{% endblock %}
Add CSS style
In [ ]:
/* app/static/styles.css */
...

ul.posts {
    list-style-type: none;
    padding: 0px;
    margin: 16px 0px 0px 0px;
    border-top: 1px solid #e0e0e0;
}
ul.posts li.post {
    padding: 8px;
    border-bottom: 1px solid #e0e0e0;
}
ul.posts li.post:hover {
    background-color: #f0f0f0;
}
...
In [ ]:
...
div.post-date {
    float: right;
}
div.post-author {
    font-weight: bold;
}
div.post-thumbnail {
    position: absolute;
}
div.post-content {
    margin-left: 48px;
    min-height: 48px;
}

You can get the above code from github
$git clone https://github.com/win911/flask_class.git- Skip this if you have done it before.
$git checkout 11a- If any error occurs, do "$ git pull origin master" first.
Remember to upgrade your DB
$python manage.py db upgrade
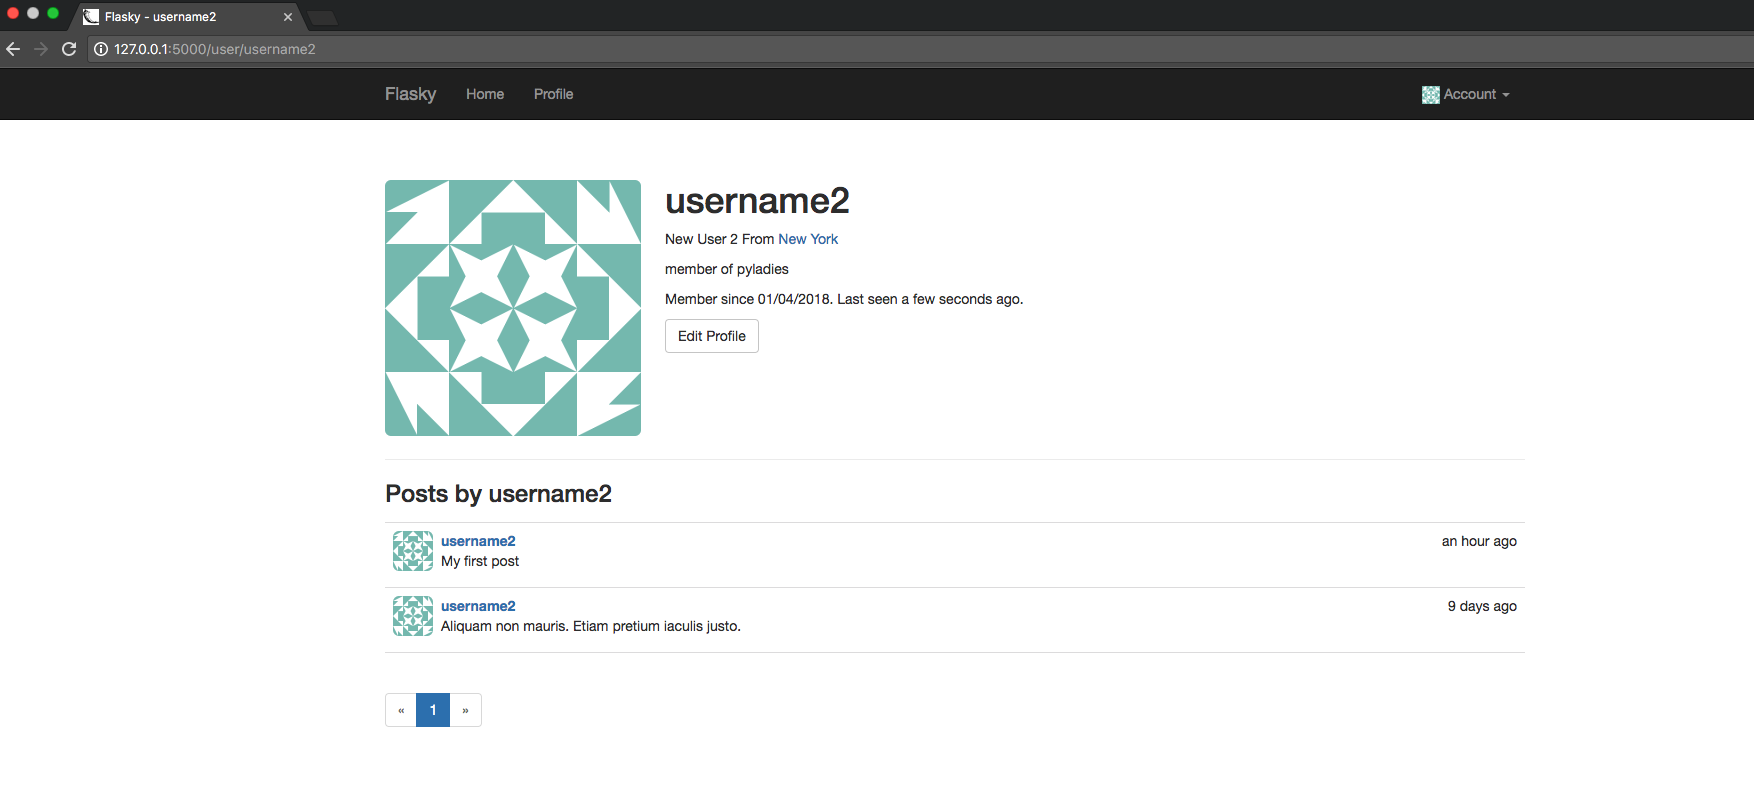
Blog posts on profile pages
- Change the profile page route to show a list of blog posts on user's profile page.
- The list of blog posts for a user is obtained from the
User.postsrelationship.
In [ ]:
# app/main/views.py

#...

@main.route('/user/<username>')
def user_profile(username):
    user = User.query.filter_by(username=username).first()
    if user is None:
        abort(404)
    posts = user.posts.order_by(Post.timestamp.desc()).all()
    return render_template('user.html', user=user, posts=posts)
Profile page template with blog posts
- We need to render the blog posts in the profile page template.
- But the
user.htmlrenders a list of blog posts like the one inindex.html. - To avoid duplicated HTML code, we move the blog posts HTML code to a new template
_posts.htmland use Jinja2'sinclude()to includes the list from an external file.- The use of an underscore prefix in the
_post.htmltemplate name is not a requirment. - It is merely an convention to distinguish standalone and partial templates.
- The use of an underscore prefix in the
In [ ]:
<!-- app/tempaltes/_post.html -->

<ul class="posts">
    {% for post in posts %}
    <li class="post">
        <div class="post-thumbnail">
            <a href="{{ url_for('.user_profile', username=post.author.username) }}">
                <img class="img-rounded profile-thumbnail" src="{{ post.author.gravatar(size=40) }}">
            </a>
        </div>
        <div class="post-content">
            <div class="post-date">{{ moment(post.timestamp).fromNow() }}</div>
            <div class="post-author"><a href="{{ url_for('.user_profile', username=post.author.username) }}">{{ post.author.username }}</a></div>
            <div class="post-body">{{ post.body }}</div>
        </div>
    </li>
    {% endfor %}
</ul>
Change index.html
- Replace the the code removed to
_post.htmlwithinclude().
In [ ]:
<!-- app/tempaltes/index.html -->

...

{% include '_posts.html' %}
{% endblock %}
Add blog post to user.html
In [ ]:
<!-- app/tempaltes/user.html -->

...

<h3>Posts by {{ user.username }}</h3>
{% include '_posts.html' %}
{% endblock %}
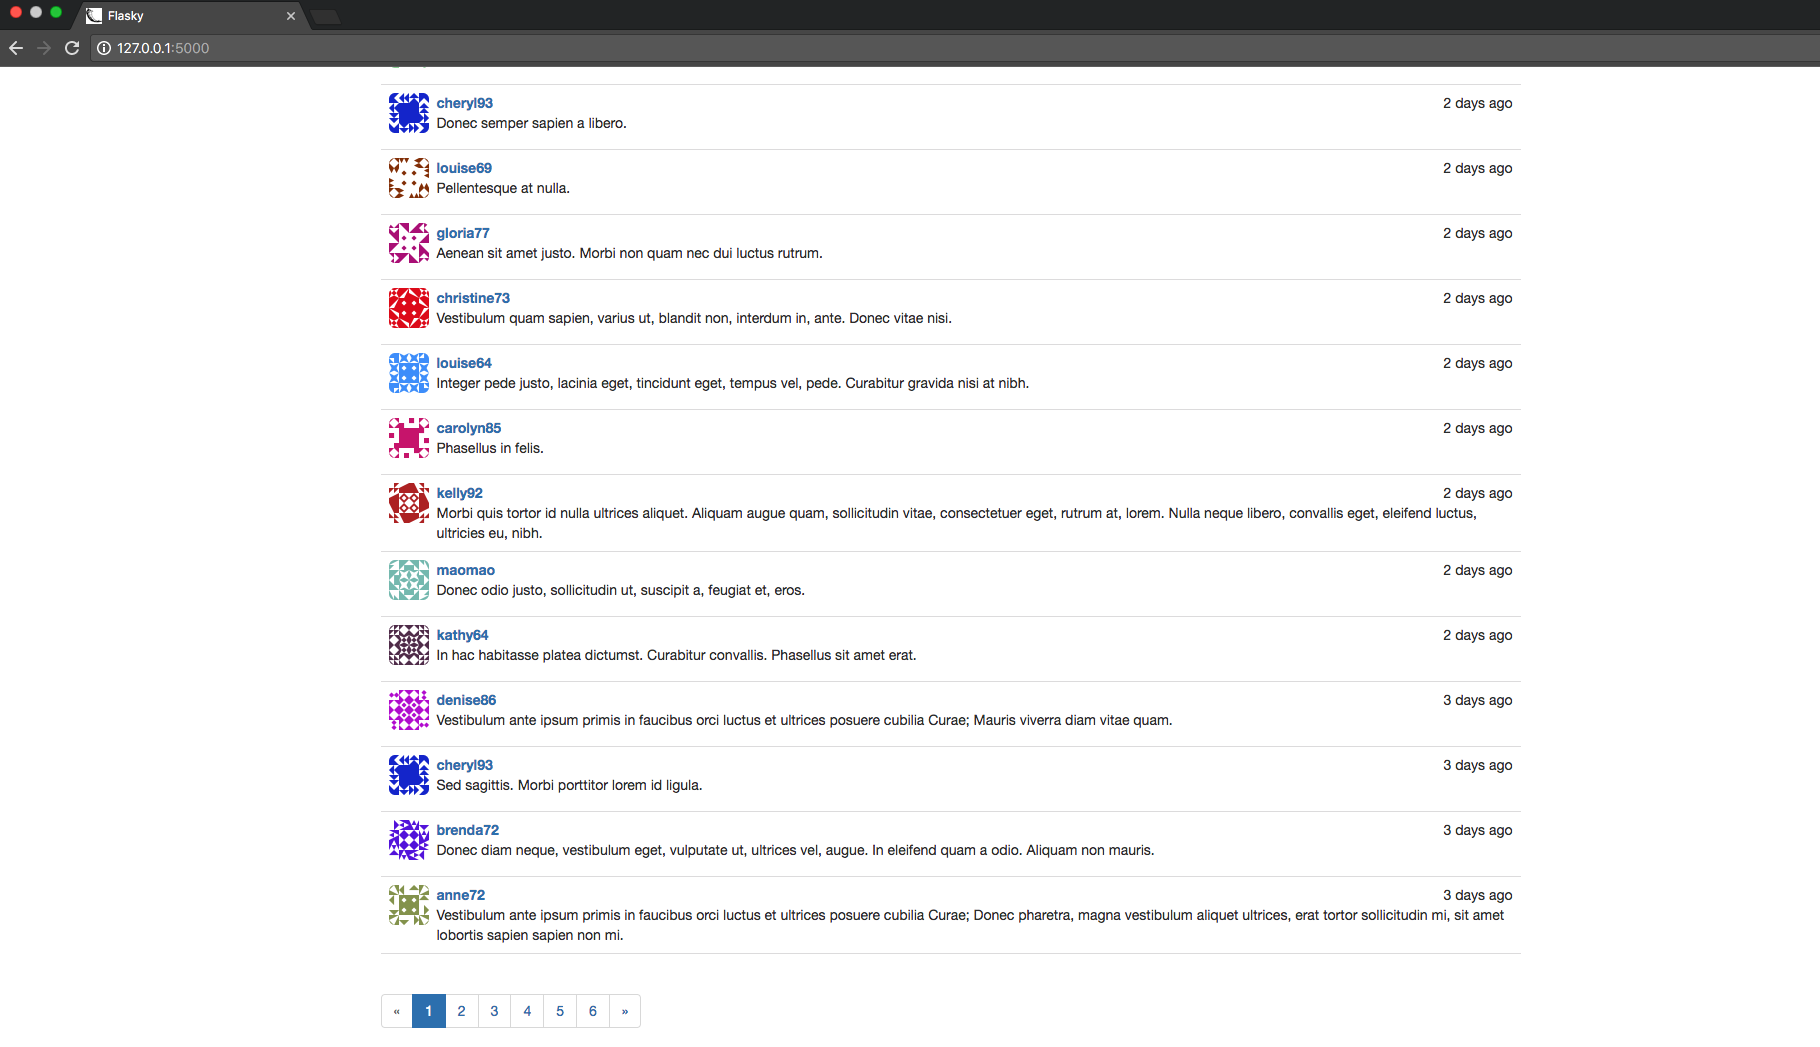
Paginate Long Blog Post Lists
- Big pages take longer to generate, download, and render in the web browser.
- The user experience decreases as the pages get larger.
Paginatethe data and render it in chunks.
Create fake blog post data
- Manually adding new database entires is time consuming and tedious.
- Use
ForgeryPypackage to generate fake data automatically. - The attributes of the fake objects (ex. email, location) are generated with ForgeryPy random information generators.
Install ForgeryPy
(venv) $ pip install forgerypyManage depencies
- The ForgeryPy package is only needed in the development stage.
- To separate the production dependencies from the development dependencies, the
requirements.txtfile can be replaced with arequirementsfolder.dev.txtfile list the dependencies that are necessary for development.prod.txtfile list the dependencies that are needed in production.common.txtfile list the common dependencies in both stages.dev.txtandprod.txtuse the-rprefix to include thecommon.txt.
requirement/common.txt
alembic==0.9.5
blinker==1.4
click==6.7
dominate==2.3.1
Flask==0.12.2
Flask-Bootstrap==3.3.7.1
Flask-JsonSchema==0.1.1
Flask-Login==0.4.0
Flask-Mail==0.9.1
Flask-Migrate==2.1.1
Flask-Moment==0.5.1
Flask-Script==2.0.5
Flask-SQLAlchemy==2.2
Flask-WTF==0.14.2
itsdangerous==0.24
Jinja2==2.9.6
jsonschema==2.6.0
Mako==1.0.7
MarkupSafe==1.0
python-dateutil==2.6.1
python-editor==1.0.3
six==1.11.0
SQLAlchemy==1.1.14
visitor==0.1.3
Werkzeug==0.12.2
WTForms==2.1
requirement/pro.txt
-r common.txt
requirements/dev.txt
-r common.txt
ForgeryPy==0.1
Generate fake users
- Add class methods to the
UserandPostmodels that can generate fake data. - Because ForgeryPy generate random information, it might have duplicates, but email address and username must be unique.
- In this case, database session commit will throw an
IntegrityErrorexception. - We handle this exception by rolling back the session before continuing.
In [ ]:
# app/models.py

class User(UserMixin, db.Model):
    #...
    @staticmethod
    def generate_fake(count=100):
        from sqlalchemy.exc import IntegrityError
        from random import seed
        import forgery_py

        seed()
        for i in range(count):
            u = User(email=forgery_py.internet.email_address(),
                     username=forgery_py.internet.user_name(True),
                     password=forgery_py.lorem_ipsum.word(),
                     confirmed=True,
                     name=forgery_py.name.full_name(),
                     location=forgery_py.address.city(),
                     about_me=forgery_py.lorem_ipsum.sentence(),
                     member_since=forgery_py.date.date(True))
            db.session.add(u)
            try:
                db.session.commit()
            except IntegrityError:
                db.session.rollback()
Generate fake posts
- To assign a random user to the random post, use
offset()query filter. offset()filter skips the number of results we generate from therandint()function.- We obtain a different user each time by setting a random offset and then calling
first().
In [ ]:
# app/models.py

class Post(db.Model):
    #...
    @staticmethod
    def generate_fake(count=100):
        from random import seed, randint
        import forgery_py

        seed()
        user_count = User.query.count()
        for i in range(count):
            u = User.query.offset(randint(0, user_count - 1)).first()
            p = Post(body=forgery_py.lorem_ipsum.sentences(randint(1, 3)),
                     timestamp=forgery_py.date.date(True),
                     author=u)
            db.session.add(p)
            db.session.commit()
Add Post to the shell context
In [ ]:
# manage.py

#...
from app.models import User, Role, Post
#...

def make_shell_context():
    return dict(app=app, db=db, User=User, Role=Role, Post=Post)

#...
Create fake users and blog posts from the Python shell
(venv) $ python manage.py shell
>>> User.generate_fake(100)
>>> Post.generate_fake(100)

Rendering Data on Pages
- Change home page route to support pagination.
- Change user profile page route to support pagination.
Page
- The page number is obtained from the request's query string, which is available as
request.args. - The default page is 1.
- The
type=intensures that if it is not an integer, the default is used.
Paginate
- To load a single page, replace
all()with Flask-SQLAlchemy'spaginate(). - The
paginate()method takes thepagenumber as the first and only requried argument. - Optional
per_pageargument can be given, the default is 20. - If a page outside of the valid range is requested,
error_out=Truewill issue a 404 error code.- True is the default value.
- If set to False, it will return an empty list of items.
In [ ]:
# app/main/views.py

from flask import render_template, redirect, url_for, abort, flash, request, current_app
#...

@main.route('/', methods=['GET', 'POST'])
def index():
    form = PostForm()
    if current_user.can(Permission.WRITE_ARTICLES) and form.validate_on_submit():
        post = Post(body=form.body.data, author=current_user._get_current_object())
        db.session.add(post)
        return redirect(url_for('.index'))
    page = request.args.get('page', 1, type=int)
    pagination = Post.query.order_by(
        Post.timestamp.desc()).paginate(page, per_page=current_app.config['FLASKY_POSTS_PER_PAGE'], error_out=False)
    posts = pagination.items
    return render_template('index.html', form=form, posts=posts, pagination=pagination)
In [ ]:
# app/main/views.py

#...

@main.route('/user/<username>')
def user_profile(username):
    user = User.query.filter_by(username=username).first()
    if user is None:
        abort(404)
    page = request.args.get('page', 1, type=int)
    pagination = user.posts.order_by(
        Post.timestamp.desc()).paginate(page, per_page=current_app.config['FLASKY_POSTS_PER_PAGE'], error_out=False)
    posts = pagination.items
    return render_template('user.html', user=user, posts=posts, pagination=pagination)
Add FLASKY_POSTS_PER_PAGE to config
In [ ]:
# config.py

#...

class Config(object):
    #...
    FLASKY_POSTS_PER_PAGE = 20

#...
Pagination object
- The return value of
paginate()is an object of classPagination. - It is defined by Flask-SQLAlchemy.
- The class contains several properties that are useful to generate page links in a template, so it is passed to the template as an argument.
Flask-SQLAlchemy pagination object attributes
| Attribute | Description |
|---|---|
| items | The records in the current page |
| query | The source query that was paginated |
| page | The current page number |
| prev_num | The previous page number |
| next_num | The next page number |
| has_next | True if there is a next page |
| has_prev | True if there is a previous page |
| pages | The total number of pages for the query |
| per_page | The number of items per page |
| total | The total number of items returned by the query |
Flask-SQLAlchemy pagination object methods
iter_pages(left_edge=2, left_current=2, right_current=5, right_edge=2)
- An iterator that returns the sequence of page numbers to display in a pagination widget.
- The list will have
left_edgepages on the left side,left_currentpages to the left of the current page,right_currentpages to the right of the current page, andright_edgepages on the right side. - For example, for page 50 of 100 this iterator configured with default values will return the following pages: 1, 2,
None, 48, 49, 50, 51, 52, 53, 54, 55,None, 99, 100. - A
Nonevalue in the sequence indicates a gap in the sequence of pages.
prev()
- A pagination object for the previous page.
next()
- A pagination object for the next page.
Add a pagination template macro
- To avoid repeatly writing the pagination footer in every template, we build a pagination footer as a reusable Jinja2 macro.
- The macro defines the following page links:
- A previous page link. This link will appear disabled if the current page is the first page.
- Links to the all pages from pagination object's
iter_pages()iterator.- These pages are rendered as links with an explicit page number, given as an argument to
url_for(). - The current page is highlighted.
- Gaps are rendered with the ellipsis character
...
- These pages are rendered as links with an explicit page number, given as an argument to
- The next page link. This link will appear disabled if the current page is the last page.
In [ ]:
<!-- app/tempaltes/_macros.html -->
{% macro pagination_widget(pagination, endpoint) %}
<ul class="pagination">
<li{% if not pagination.has_prev %} class="disabled"{% endif %}>
<a href="{% if pagination.has_prev %}{{ url_for(endpoint, page=pagination.prev_num, **kwargs) }}{% else %}#{% endif %}">
«
</a>
</li>
{% for p in pagination.iter_pages() %}
{% if p %}
{% if p == pagination.page %}
<li class="active">
<a href="{{ url_for(endpoint, page = p, **kwargs) }}">{{ p }}</a>
</li>
{% else %}
<li>
<a href="{{ url_for(endpoint, page = p, **kwargs) }}">{{ p }}</a>
</li>
{% endif %}
{% else %}
<li class="disabled"><a href="#">…</a></li>
{% endif %}
{% endfor %}
<li{% if not pagination.has_next %} class="disabled"{% endif %}>
<a href="{% if pagination.has_next %}{{ url_for(endpoint, page=pagination.next_num, **kwargs) }}{% else %}#{% endif %}">
»
</a>
</li>
</ul>
{% endmacro %}
Add Pagination footer to index.html and user.html
- Add
pagination_widgetmacro below the_post.htmltemplate. - Remember to import the macro.
In [ ]:
<!-- app/tempaltes/index.html -->

{% extends "base.html" %}
{% import "bootstrap/wtf.html" as wtf %}
{% import "_macros.html" as macros %}

...

{% include '_posts.html' %}
{% if pagination %}
<div class="pagination">
    {{ macros.pagination_widget(pagination, '.index') }}
</div>
{% endif %}
{% endblock %}
In [ ]:
<!-- app/templates/user.html -->

{% extends "base.html" %}
{% import "_macros.html" as macros %}

...

<h3>Posts by {{ user.username }}</h3>
{% include '_posts.html' %}
{% if pagination %}
<div class="pagination">
    {{ macros.pagination_widget(pagination, '.user_profile', username=user.username) }}
</div>
{% endif %}
{% endblock %}
You can get the above code from github
$git clone https://github.com/win911/flask_class.git- Skip this if you have done it before.
$git checkout 11b- If any error occurs, do "$ git pull origin master" first.
Rich-Text Posts with Markdown and Flask-PageDown
- Upgrade text area to support the Markdown syntax and present a rich-text preview of the post.
- The implementation of the feature requries these packages PageDown, Flask-PageDown, Markdown, and Bleach.
Install
(venv) $ pip install flask-pagedown markdown bleach
Using Flask-PageDown
- The Flask-PageDown extension defines a
PageDownFieldclass that has the same interface as theTextAreaFieldfrom WTForms.
Initialize Flask-PageDown
In [ ]:
# app/__init__.py

#...
from flask_pagedown import PageDown

#...
pagedown = PageDown()

#...
def create_app(config_name):
    #...
    pagedown.init_app(app)

    #...
Markdown-enabled post form
- Change the
bodyfield of thePostFormto aPageDownField.
In [ ]:
# app/main/forms.py

from flask_pagedown.fields import PageDownField

#...

class PostForm(FlaskForm):
    body = PageDownField("What's on your mind?", validators=[Required()])
    submit = SubmitField('Submit')
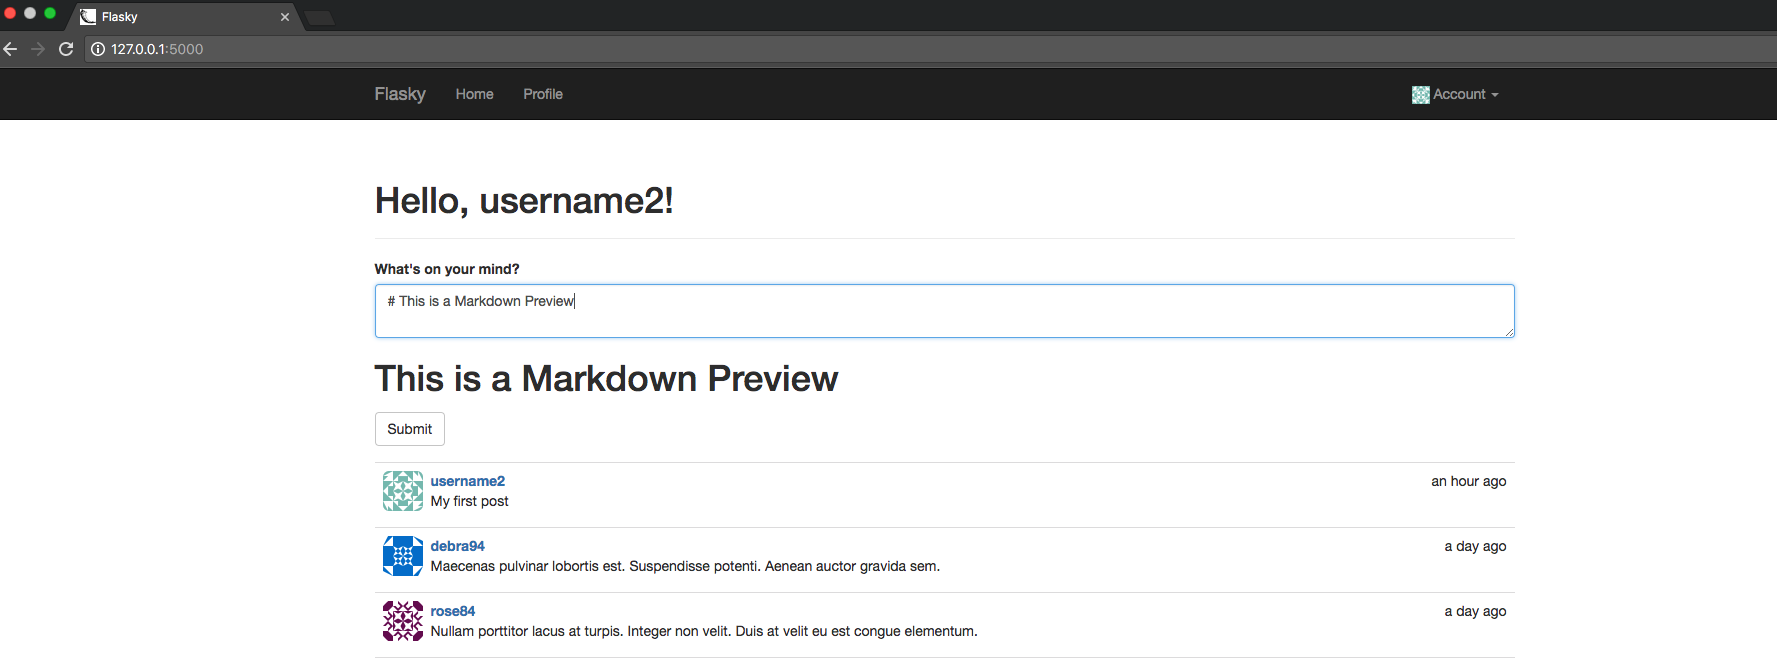
Add markedown preview to the template
- The Markdown preview is generated through the
PageDownlibraries. - Flask-PageDown provides a template macro.
- Markdown-formateed text typed in the text are field will be immediately rendered as HTML in the preview area below.
In [ ]:
<!-- app/tempaltes/index.html -->

{% extends "base.html" %}
{% import "bootstrap/wtf.html" as wtf %}
{% import "_macros.html" as macros %}

{% block scripts %}
{{ super() }}
{{ pagedown.include_pagedown() }}
{% endblock %}

{% block title %}Flasky{% endblock %}

...
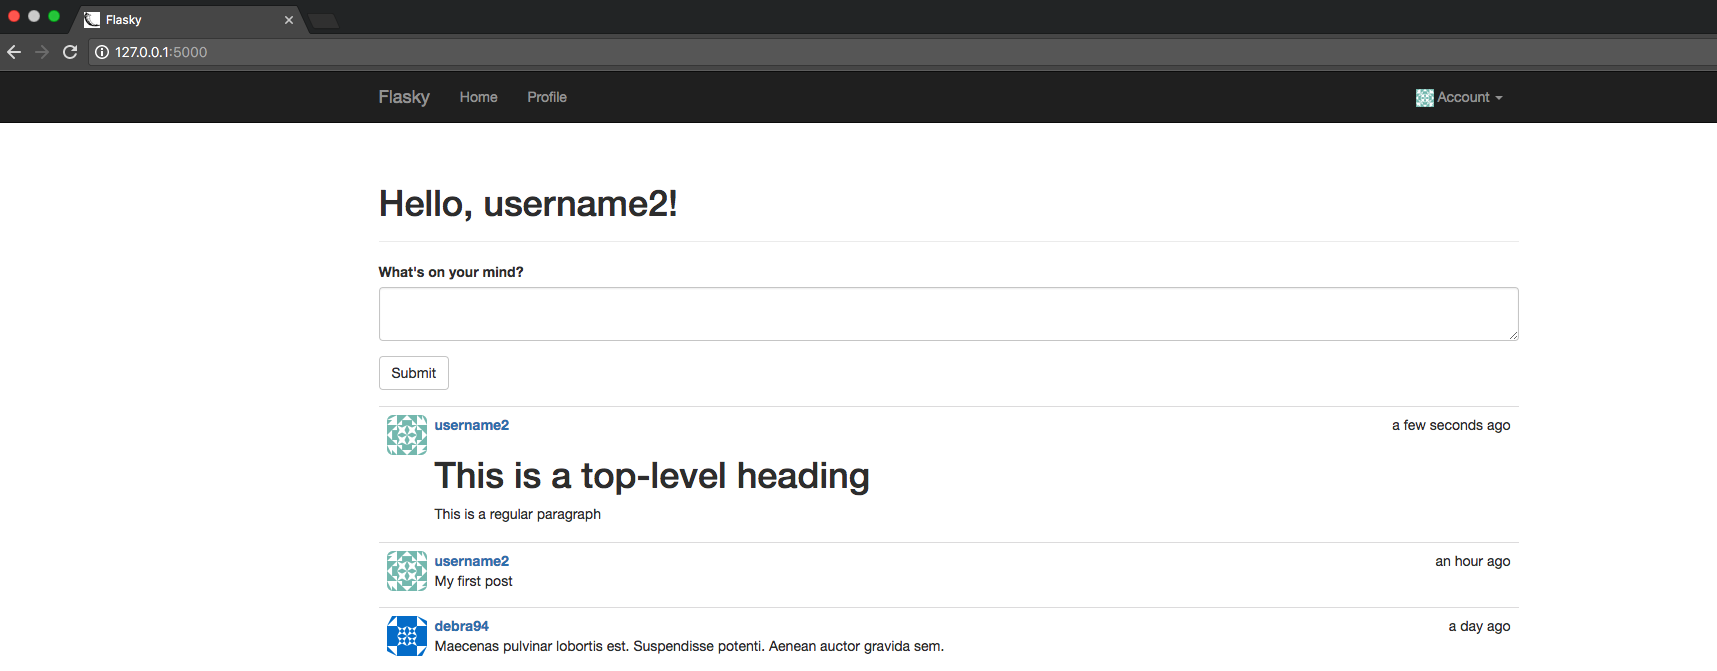
Handling rich text on the server
- When the form is submitted, only the raw Markdown text is sent with the
POSTrequest. - Once in the server, it is converted again to HTML using Markdown, a Python Markdown-to-HTML converter.
- The HTML will be sanitized with Bleach to ensure that only a short list of allowed HTML tags are used.
- To avoid converteing Markdown to HTML everytime the page is rendered, we store the HTML code in the
Postmodel. - The original Markdown source is stored in
Postso the post can be edited later.
Markdown text handling in the Post model
In [ ]:
# app/models.py

from markdown import markdown
import bleach

#...

class Post(db.Model):
    #...
    body_html = db.Column(db.Text)

    #...

    @staticmethod
    def on_changed_body(target, value, oldvalue, initiator):
        allowed_tags = ['a', 'abbr', 'acronym', 'b', 'blockquote', 'code',
                        'em', 'i', 'li', 'ol', 'pre', 'strong', 'ul',
                        'h1', 'h2', 'h3', 'p']
        target.body_html = bleach.linkify(bleach.clean(
            markdown(value, output_format='html'),
            tags=allowed_tags, strip=True))


db.event.listen(Post.body, 'set', Post.on_changed_body)
Replace post.body with post.body_html
- Jinja2 escapes all template variables by default as a security measure.
- The Markdown-generated HTML was generate in the server, so it is safe to render.
- We add
| safeto tell Jinja 2 not to escapte the HTML elements.
In [ ]:
<!-- app/tempaltes/_posts.html -->

...
            <div class="post-body">
                {% if post.body_html %}
                    {{ post.body_html | safe }}
                {% else %}
                    {{ post.body }}
                {% endif %}
            </div>
...
Upgrade database
(venv) $ python manage.py db upgrade
You can get the above code from github
$git clone https://github.com/win911/flask_class.git- Skip this if you have done it before.
$git checkout 11c- If any error occurs, do "$ git pull origin master" first.
Remember to upgrade your DB
$python manage.py db upgrade
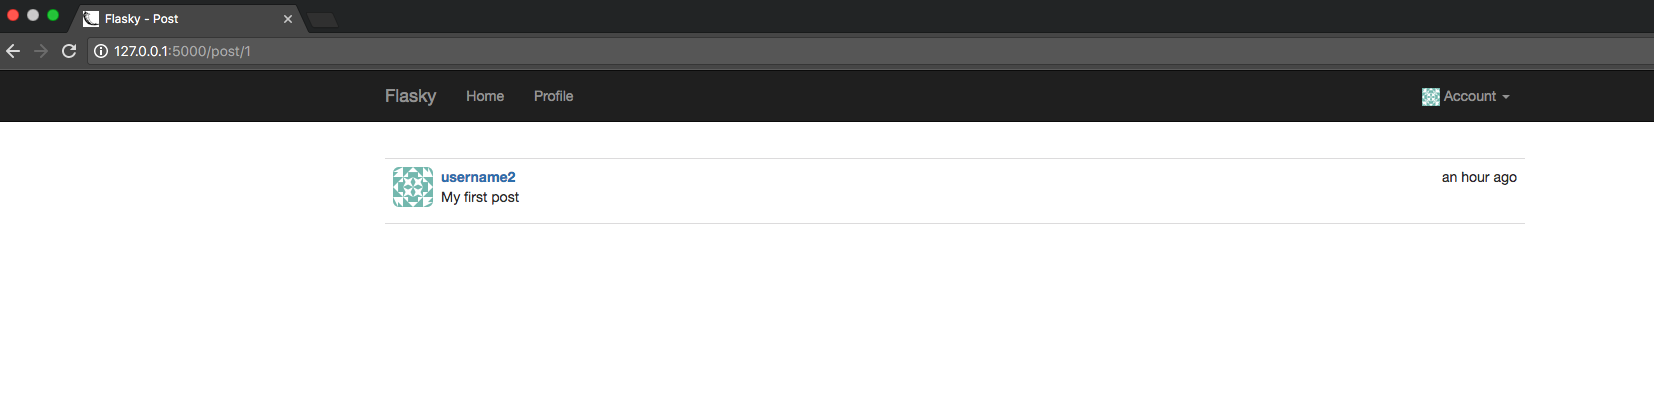
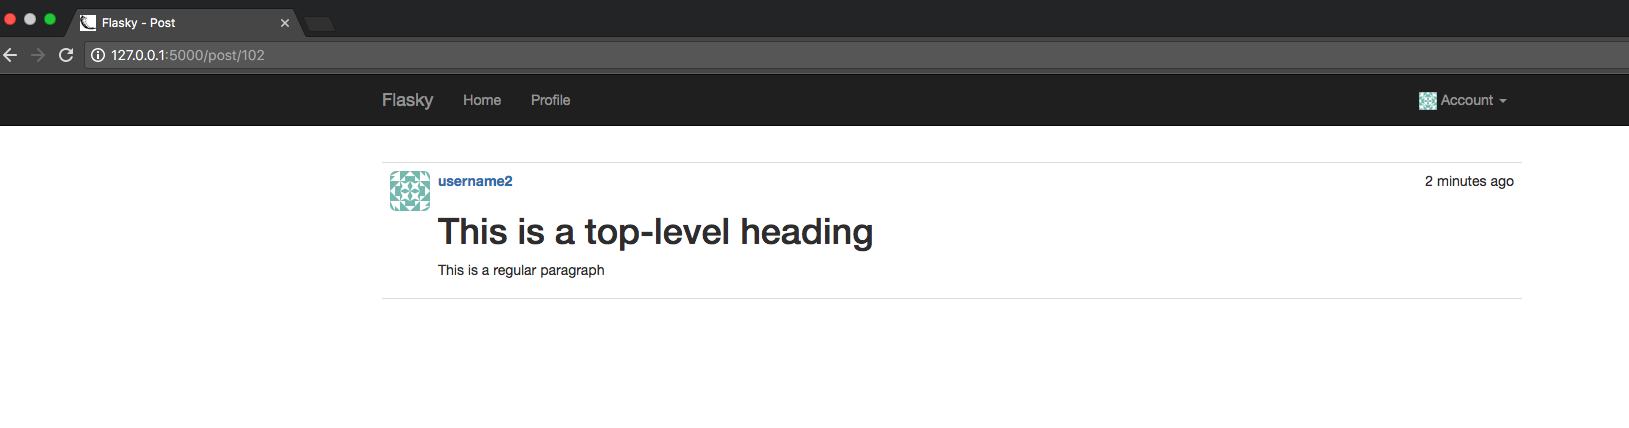
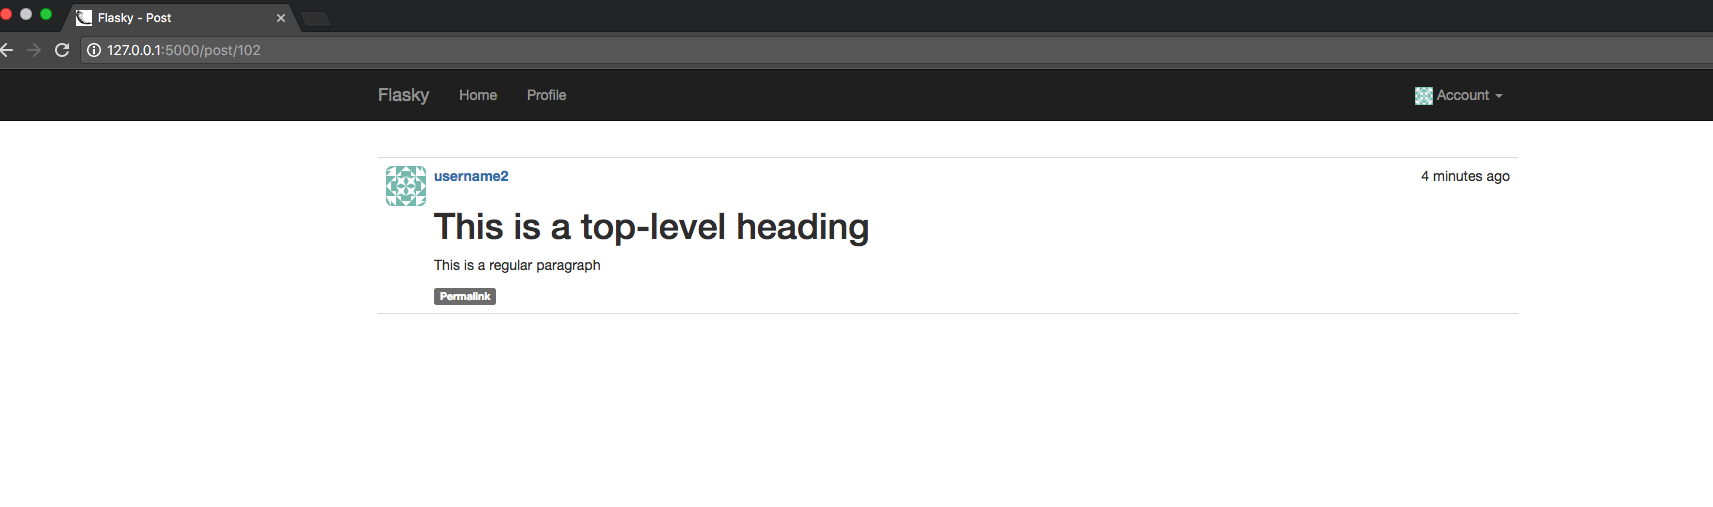
Permanent Links to Blog Posts
- User may want to share links to specific blog post.
- Therefore, we assign an unique URL to each post.
Blog post URL routing
- The URLs are constructed with the unique
idfield assigned when the post is inserted in the database. - The
post.htmltemplate receives a list with just the post to render. - Sending a list is necessary so we can use the
_posts.htmltemplate here as well.
In [ ]:
# app/main/views.py

#...

@main.route('/post/<int:id>')
def post(id):
    post = Post.query.get_or_404(id)
    return render_template('post.html', posts=[post])
Permanent link template
In [ ]:
<!-- app/tempaltes/post.html -->

{% extends "base.html" %}
{% import "_macros.html" as macros %}

{% block title %}Flasky - Post{% endblock %}

{% block page_content %}
{% include '_posts.html' %}
{% endblock %}
Add permanent links at the bottom of each post in the generic _post.html
In [ ]:
<!-- app/tempaltes/_posts.html -->

<ul class="posts">
        ...
        <div class="post-content">
            ...
            <div class="post-footer">
                <a href="{{ url_for('.post', id=post.id) }}">
                    <span class="label label-default">Permalink</span>
                </a>
            </div>
        </div>
    </li>
    {% endfor %}
</ul>
You can get the above code from github
$git clone https://github.com/win911/flask_class.git- Skip this if you have done it before.
$git checkout 11d- If any error occurs, do "$ git pull origin master" first.
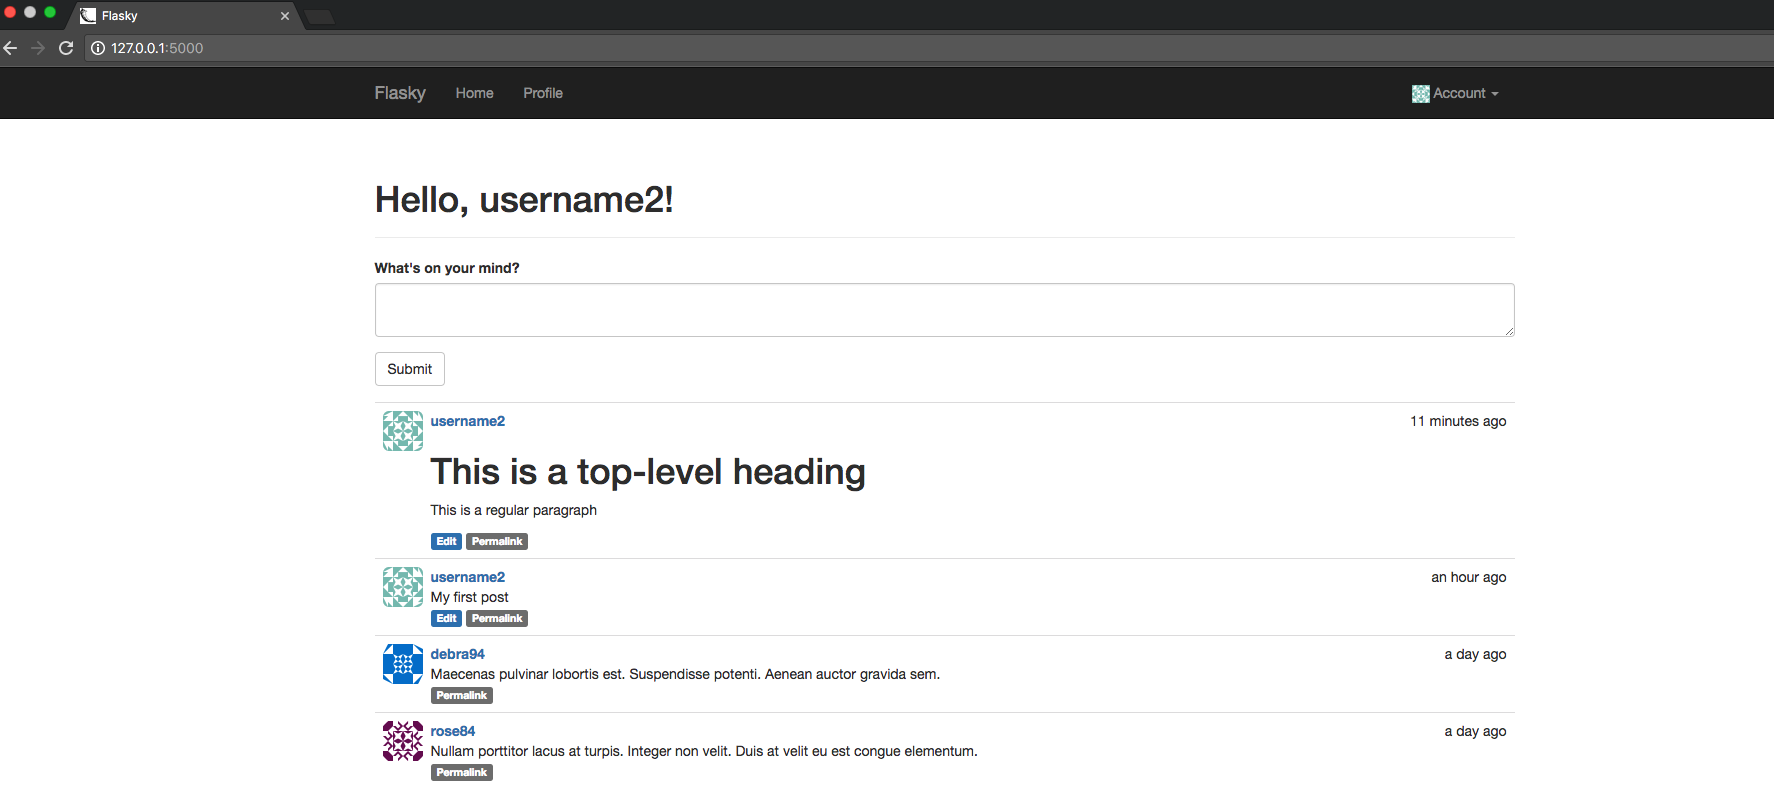
Blog Post Editor
- Reuse the blog post form as the editor.
- The current version of the post will be shown on the form, followed by a Markdown preview.
Create blog post editor template
In [ ]:
<!-- app/tempaltes/edit_post.html -->

{% extends "base.html" %}
{% import "bootstrap/wtf.html" as wtf %}

{% block title %}Flasky - Edit Post{% endblock %}

{% block page_content %}
<div class="page-header">
    <h1>Edit Post</h1>
</div>
<div>
    {{ wtf.quick_form(form) }}
</div>
{% endblock %}

{% block scripts %}
{{ super() }}
{{ pagedown.include_pagedown() }}
{% endblock %}
Create blog post editor routing
- The blog post body will be set as its originial content first.
- Only the author of the blog post can edit it, except for administrator.
- If a user tries to edit a post from another user, a 403 error will occur.
In [ ]:
# app/main/views.py

#...

@main.route('/edit/<int:id>', methods=['GET', 'POST'])
@login_required
def edit(id):
    post = Post.query.get_or_404(id)
    if current_user != post.author and \
            not current_user.can(Permission.ADMINISTER):
        abort(403)

    form = PostForm()
    if form.validate_on_submit():
        post.body = form.body.data
        db.session.add(post)
        db.session.commit()
        flash('The post has been updated.')
        return redirect(url_for('.post', id=post.id))

    form.body.data = post.body
    return render_template('edit_post.html', form=form)
Add blog post editor link to each posts
- A link to the blog post editor can be added below each blog post, next to the permanent link.
In [ ]:
<!-- app/tempaltes/_posts.html -->

<ul class="posts">
        ...
        <div class="post-content">
            ...
            <div class="post-footer">
                {% if current_user == post.author %}
                <a href="{{ url_for('.edit', id=post.id) }}">
                    <span class="label label-primary">Edit</span>
                </a>
                {% elif current_user.is_administrator() %}
                <a href="{{ url_for('.edit', id=post.id) }}">
                    <span class="label label-danger">Edit [Admin]</span>
                </a>
                {% endif %}
                <a href="{{ url_for('.post', id=post.id) }}">
                    <span class="label label-default">Permalink</span>
                </a>
            </div>
        </div>
    </li>
    {% endfor %}
</ul>
You can get the above code from github
$git clone https://github.com/win911/flask_class.git- Skip this if you have done it before.
$git checkout 11e- If any error occurs, do "$ git pull origin master" first.